Overview
Hightouch helps customers manage large teams via a third-party identity provider (IdP), such as Okta and Microsoft Entra ID (formerly known as Azure Active Directory). We support the following integration points and security standards:
| Integration point | Security standard |
|---|---|
| User account creation | SAML SSO |
| Role and workspace assignment | SSO groups |
| User account updates and deletions | SCIM |
Required permissions
SSO / SCIM setup requires:
- Admin access to your company's identity provider, usually members of your IT team have this
updatepermission for theworkspaceresource in Hightouch—the Admin role has this permission, but you can also create custom roles with it
SAML single sign-on
SAML single sign-on (SSO) provides just-in-time (JIT) provisioning. With SSO configured, when members of your organization go to the Hightouch login screen, they can select Enterprise Sign-in to access your workspaces.
When they try to sign in to Hightouch, Hightouch uses the credentials given by your identity provider. If the credentials are authorized, Hightouch signs the user in. If it's a credentialed user's first time signing in, Hightouch provisions an account for that user.
With SSO enabled, Hightouch also checks for updates in user attributes. That way, if a user's email changes, Hightouch gets the updated details when they sign in again.
The SAML configuration process may differ slightly depending on the identity provider. You can find detailed instructions for Okta and Microsoft Entra ID (formerly known as Azure Active Directory) in the following sections, but the process is similar for other identity providers.
To learn more generally about SSO and SAML check out this introductory video.
SAML SSO and SSO groups
Once you've setup your SAML SSO, it's highly recommended to setup SSO groups to automatically assign Hightouch roles. The only reason to not setup SSO groups is if you want every member in your workspace to have the default workspace role.
If you set up SAML SSO but disable default role assignment and don't map SSO groups, users are blocked from accessing Hightouch.
Single sign-on use with password sign-ins
In some cases, you may want to have both SSO and password-based access. For example, you may want everyone in your organization to access Hightouch via SSO but also want to invite third-party contractors with a different email domain to your workspace.
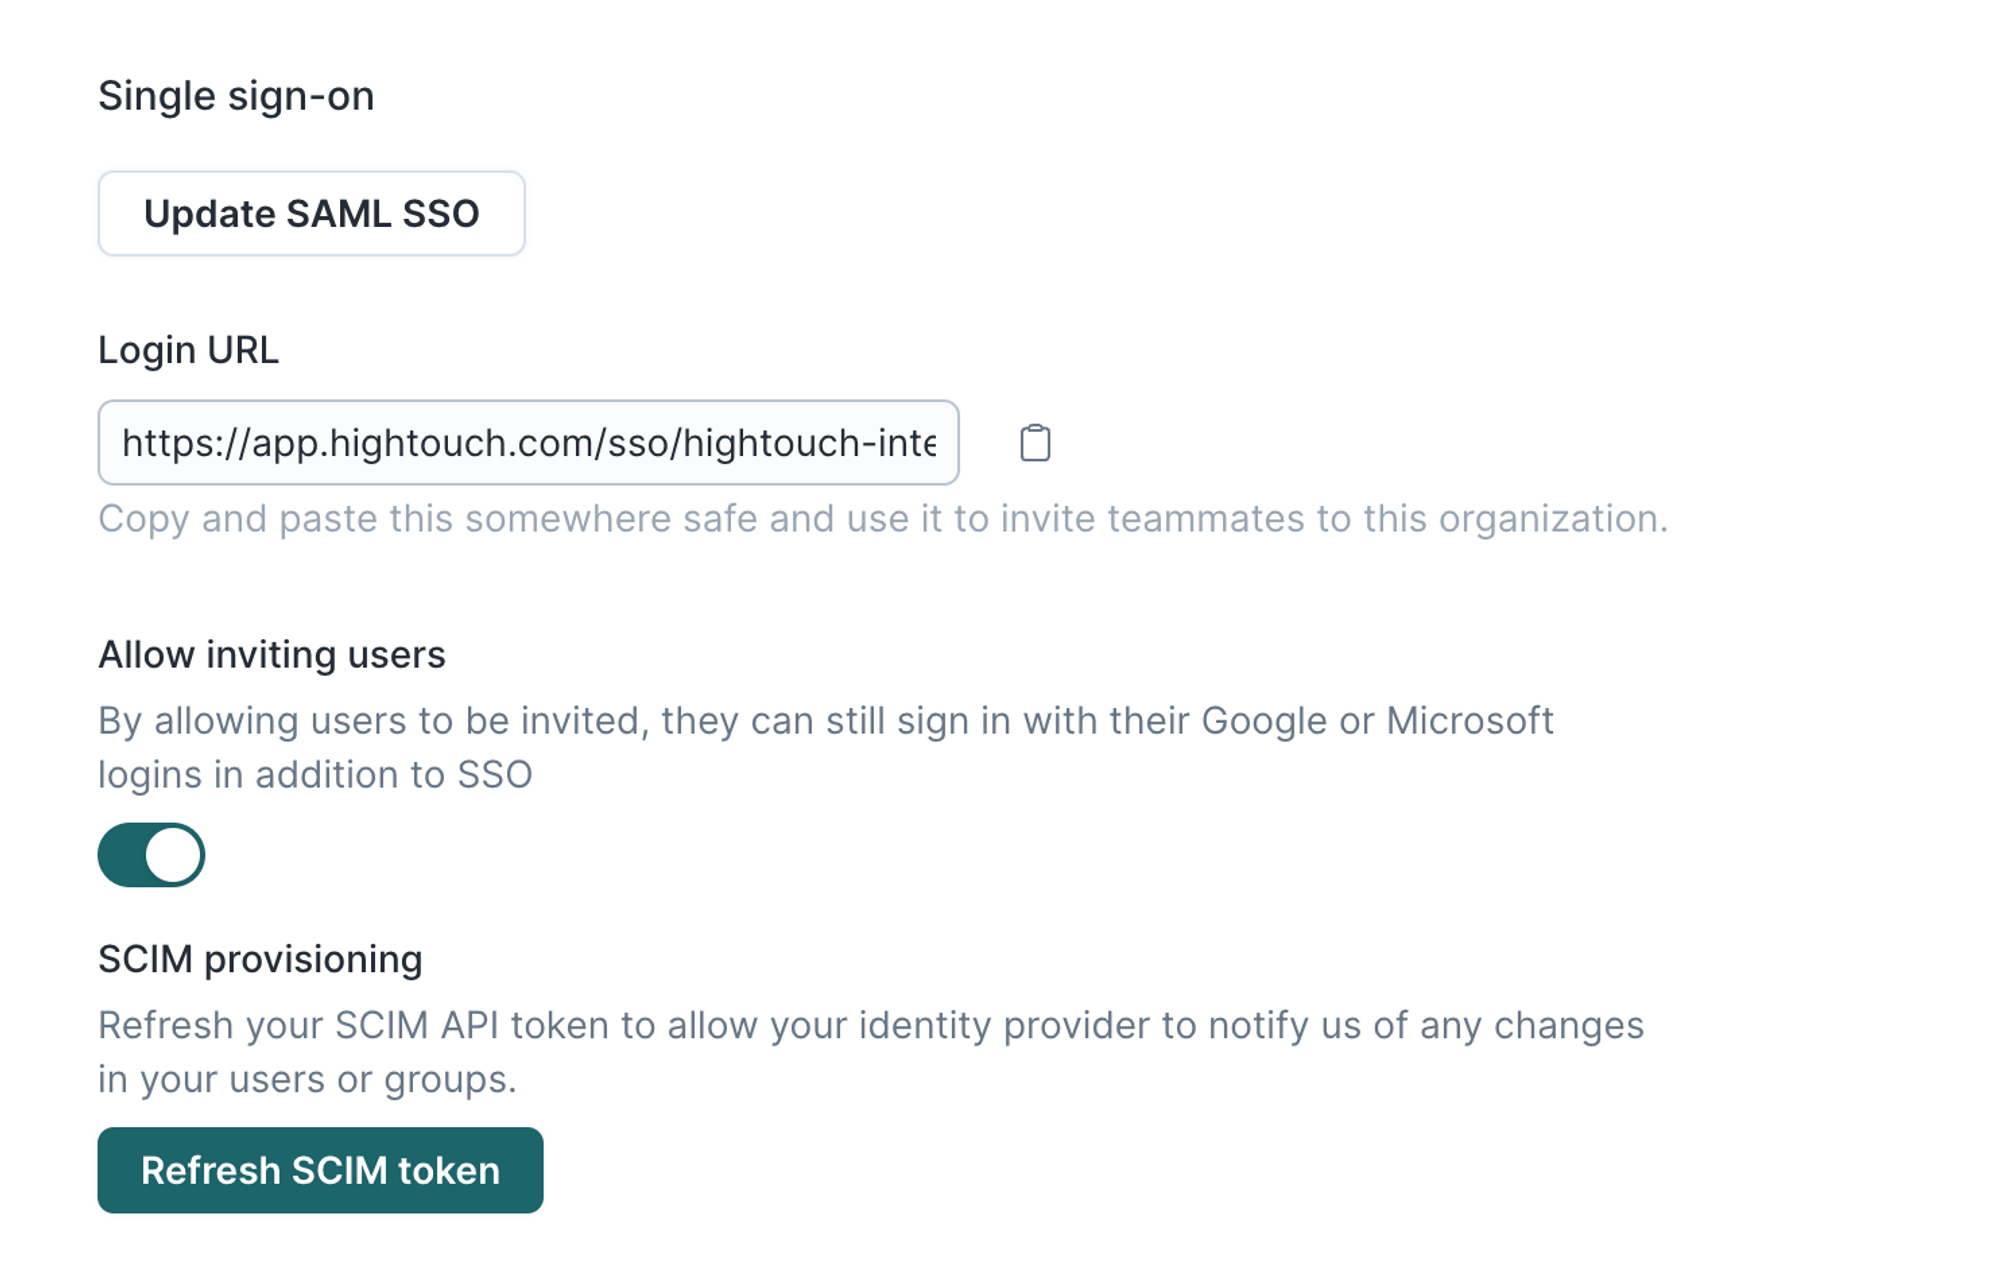
To allow both SSO and user invitations, you can toggle on Allow inviting users on the Single sign-on tab on the Settings page. The Allow inviting users setting allows users to sign in via a Google or Microsoft account. Once SSO is enabled, users won't be able to Login with email from the login page, even if you've enabled Allow inviting users.

If you only want to allow access via SSO and not Google or Microsoft logins, leave the Allow inviting users setting toggled off.
If users signed into your workspace before you configure SSO, and then sign in with SSO after it's enabled, they will have duplicate user profiles: one for previous non-SSO account and one for their SSO account. You can safely delete the non-SSO user profile from the Members tab, but it's not necessary to do so.
If there are any users in your Hightouch workspace that aren't members in your identity provider and should be, delete them from Hightouch and re-add them via the identity provider to avoid duplicate user profiles.
Okta SAML SSO configuration
The first step to configuring SSO in Okta is creating a new SAML application. Follow the linked instructions or the steps below.
- In your Okta instance, go to Applications and select Create App Integration.

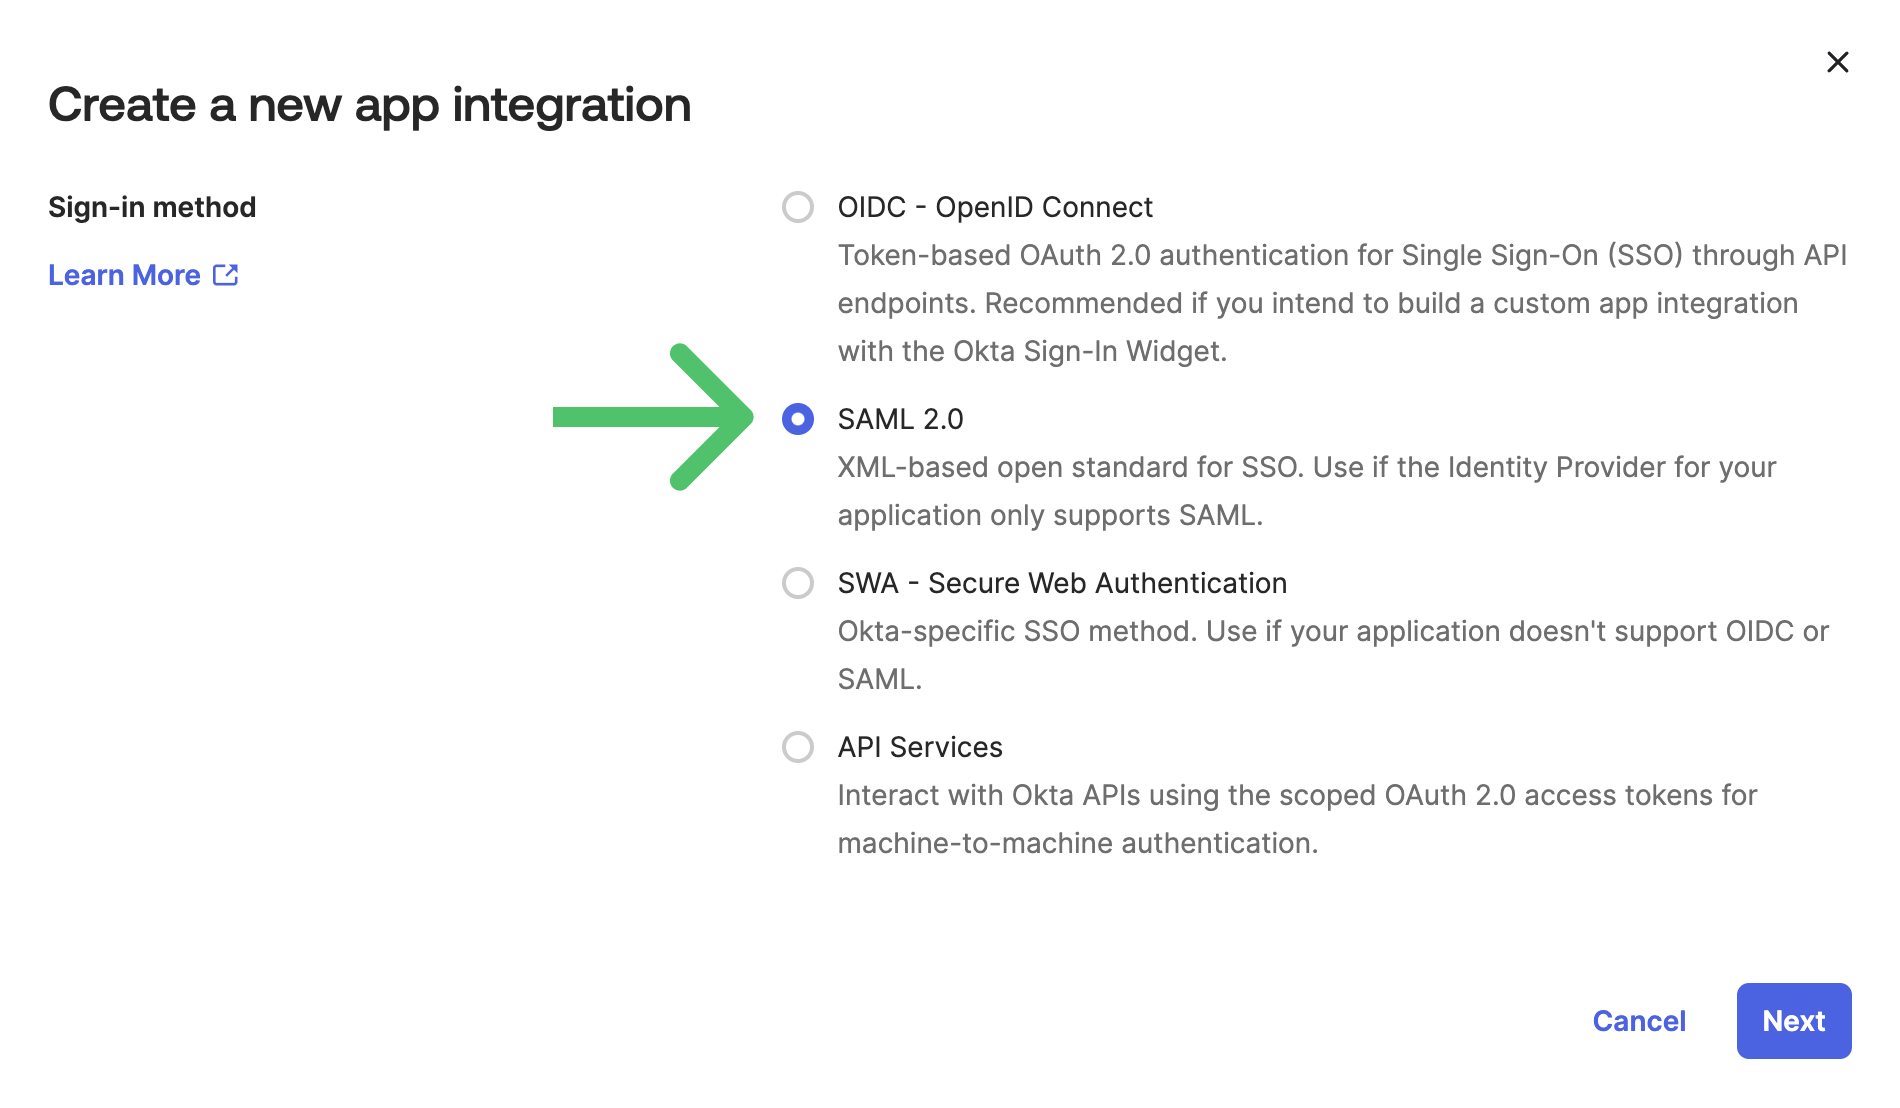
- Select SAML 2.0 as the sign-in method and click Next.
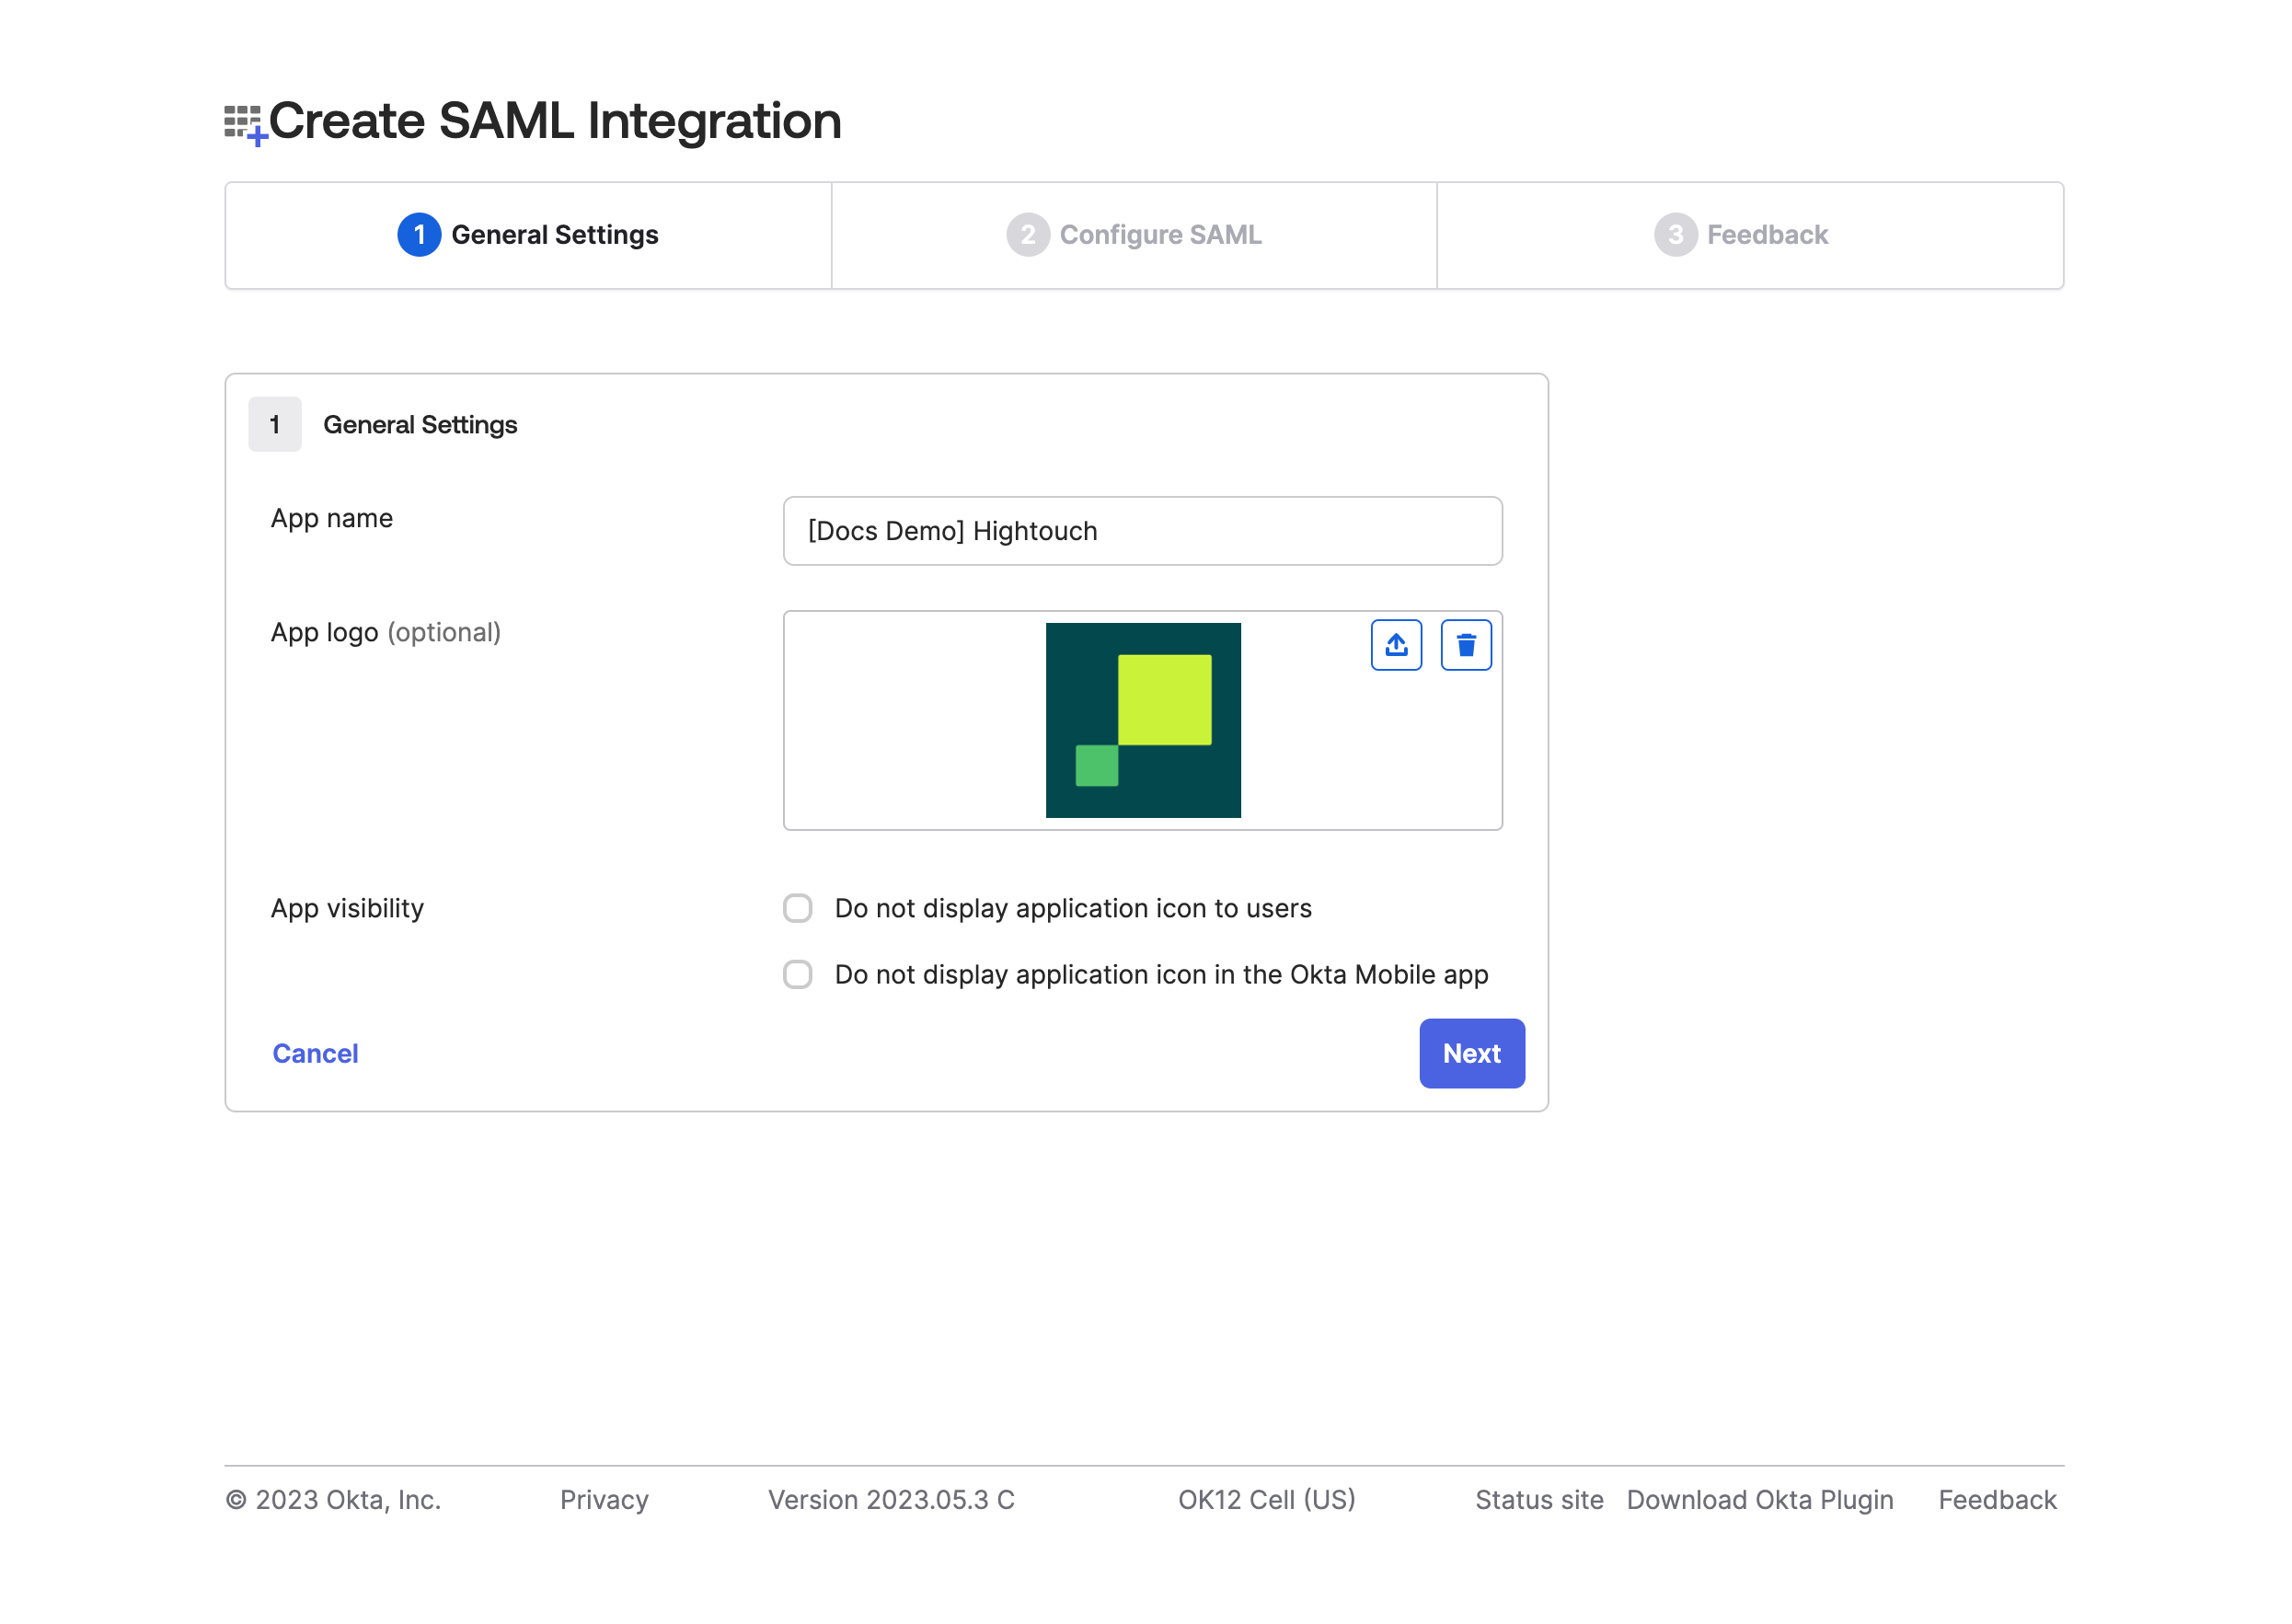
- Give your application a descriptive App Name, for example, "Hightouch," and optionally add the Hightouch logo. Click Next.
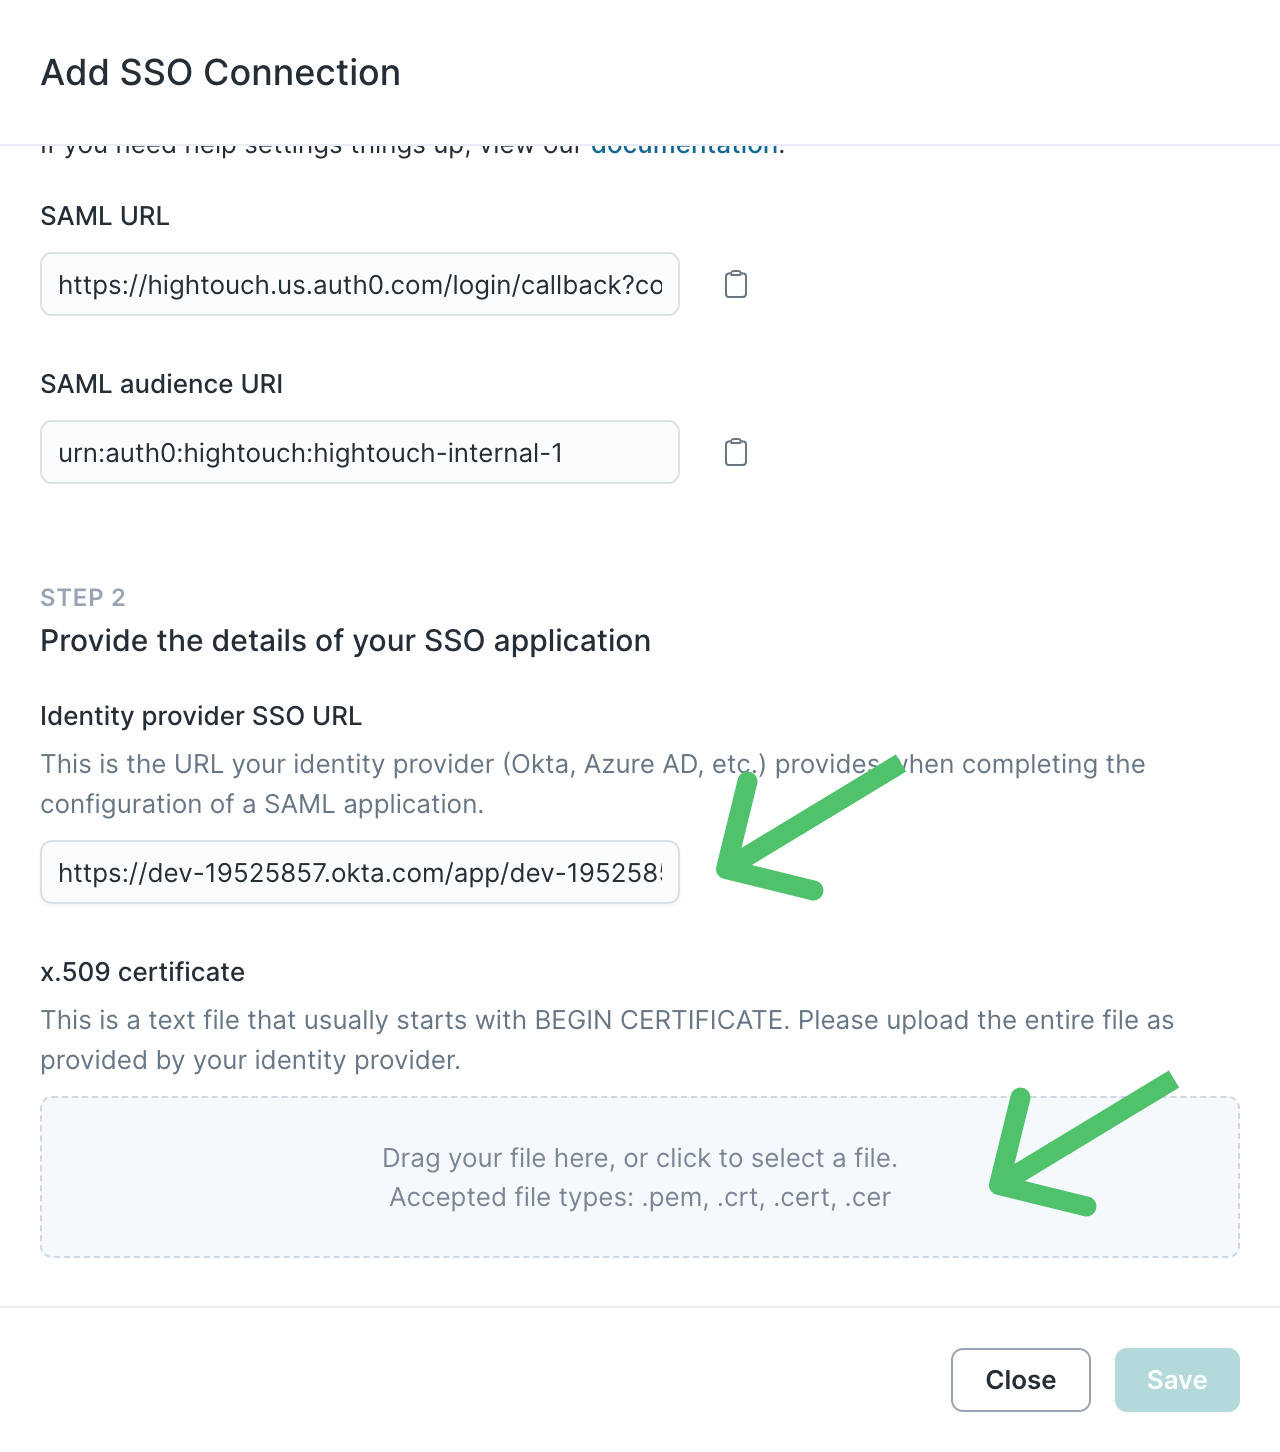
- In Hightouch, open the Single sign-on tab on the Settings page. Click Add SAML SSO to open a modal with SAML URL and SAML Audience URL.
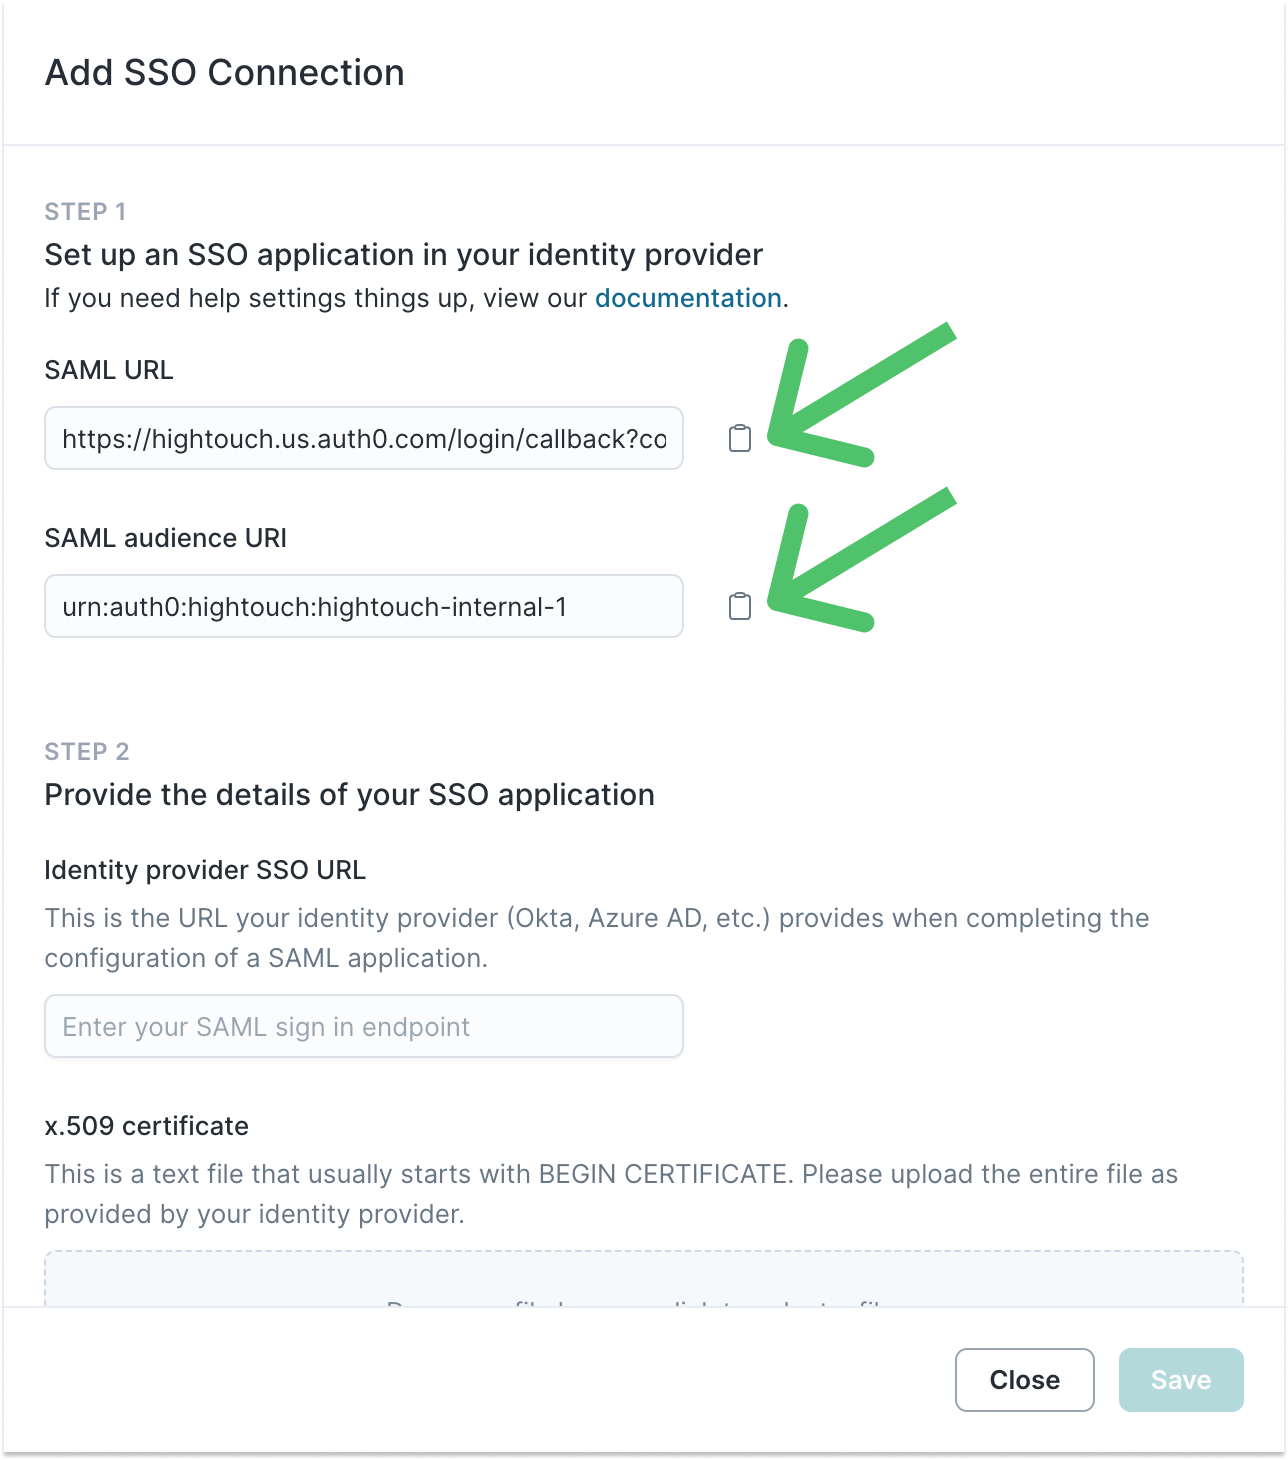
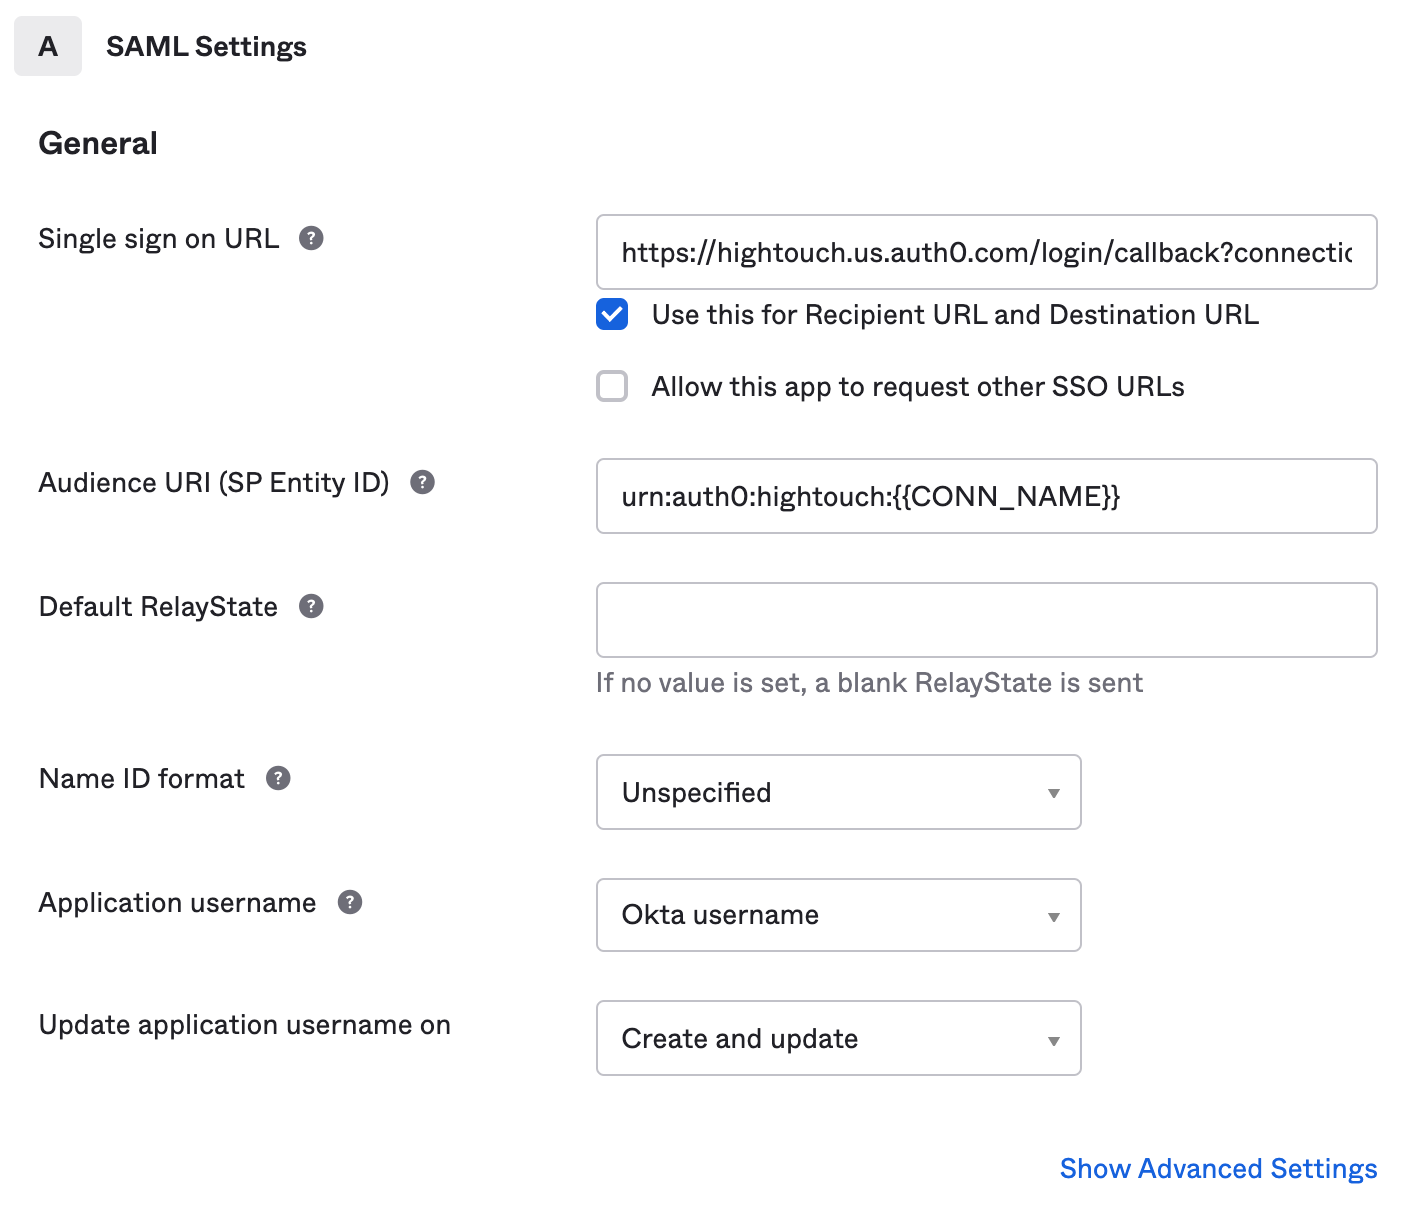
- Configure your SAML Settings in Okta: enter the SAML URL from the modal in the previous step as the Single sign on URL and SAML Audience URL as the Audience URI (SP Entity ID). You can leave the other fields as the default values.
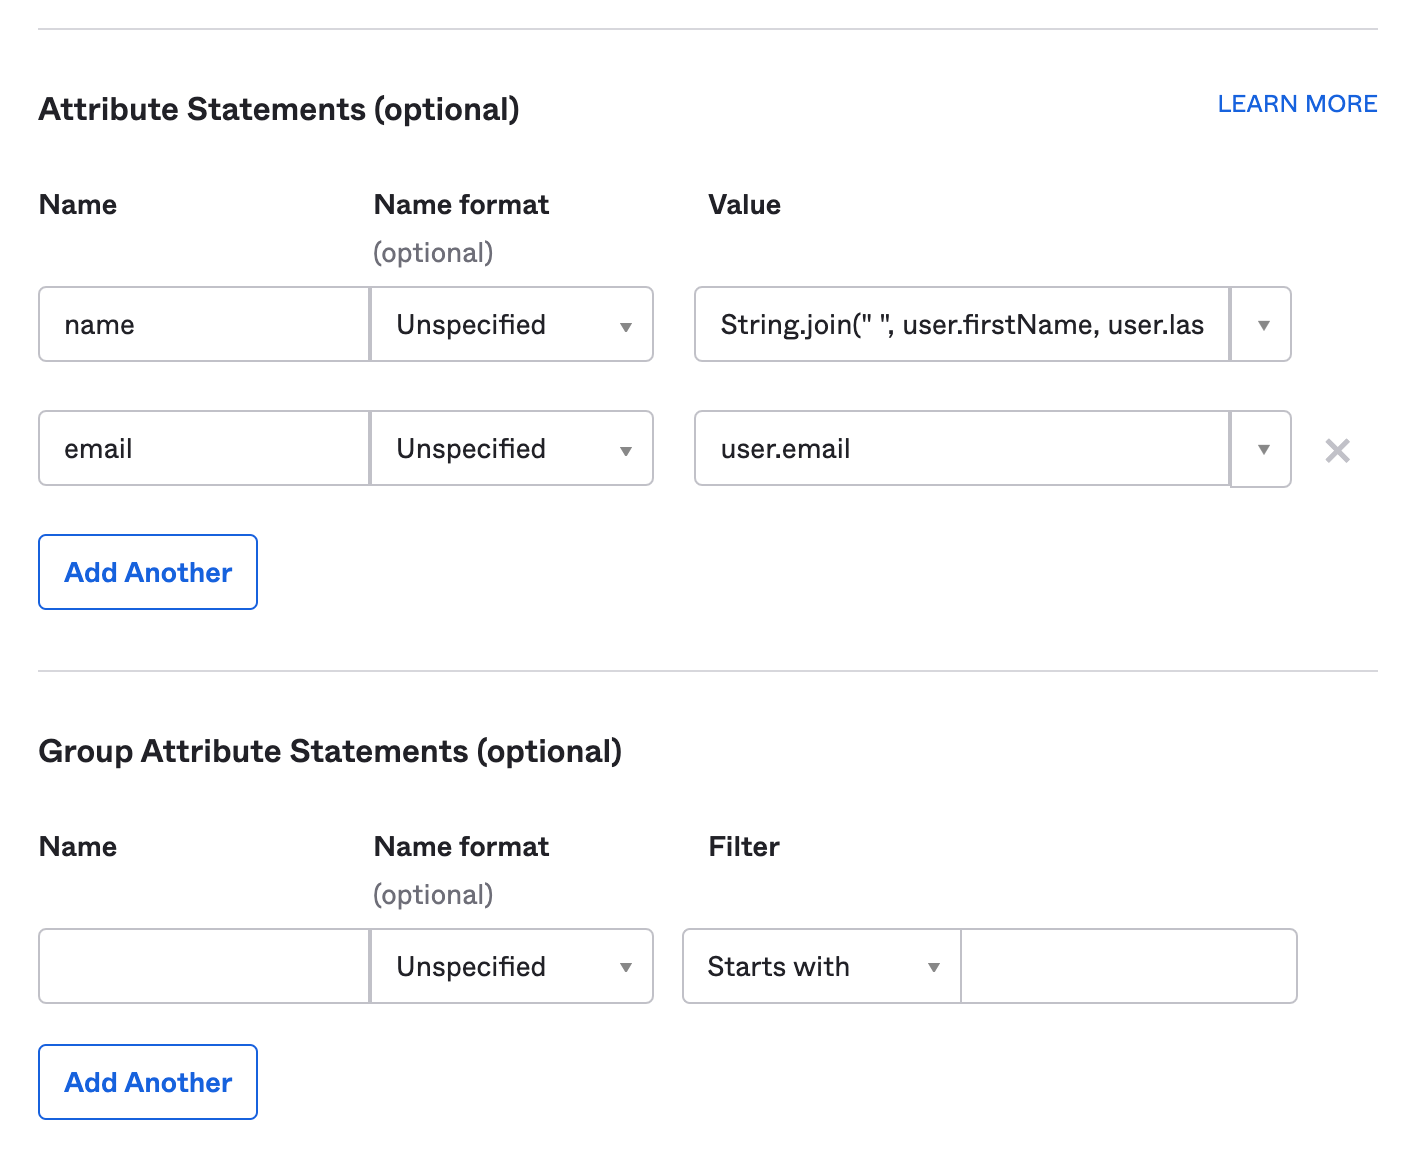
- Under Attribute Statements, set attribute mappings for
nameandemail. For example, you may set yournameAttribute Statement to something likeString.join(" ", user.firstName, user.lastName)andemailasuser.email. This assumes that users in your Okta instance havefirstName,lastName, andemailproperties; you should alter this according to your Okta user profile properties. Click Next.
-
For the prompt Help Okta Support understand how you configured this application, select I'm an Okta customer adding an internal app. You can optionally fill in the other prompts which provide information to Okta Support. Click Finish.
-
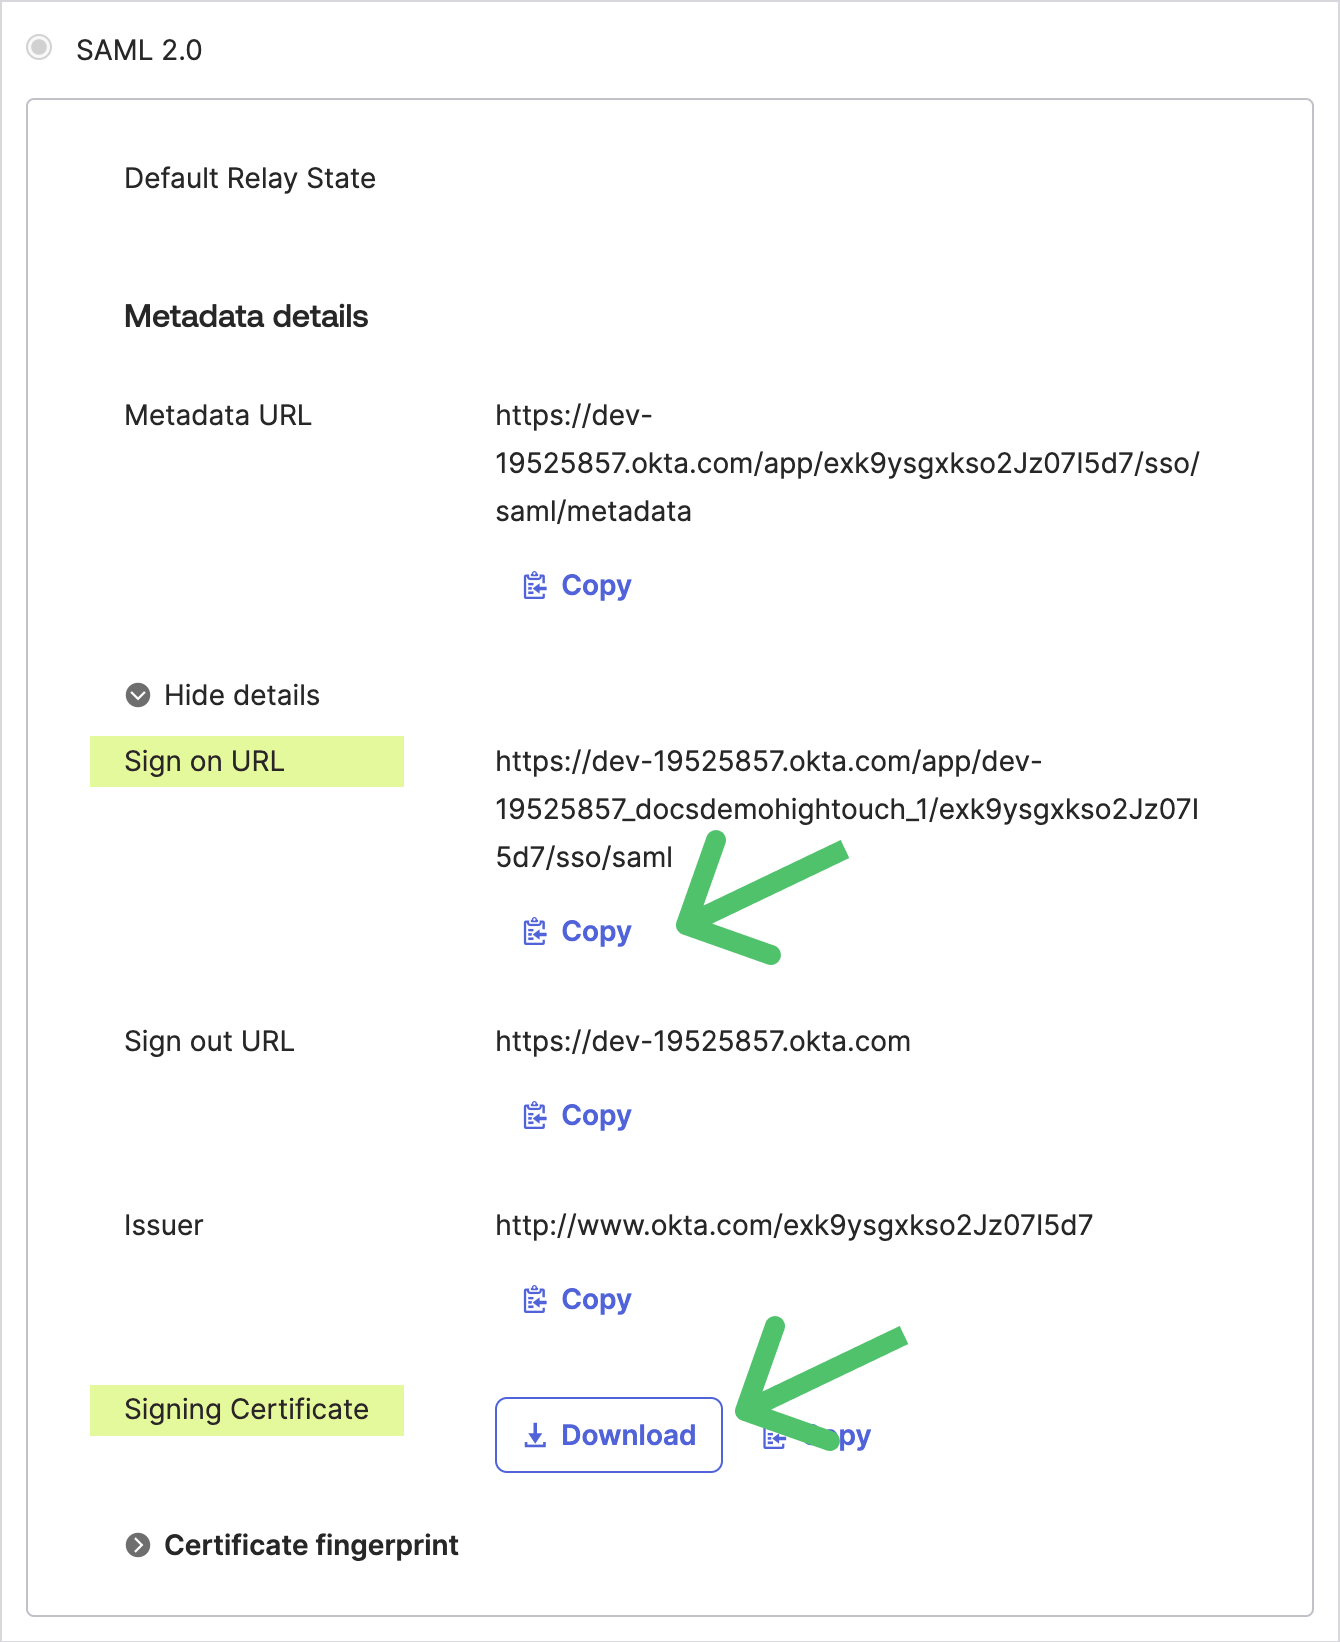
After clicking Finish, Okta brings you to the overview page of your newly created application. Under Metadata details, click More details and copy the Sign on URL and download the Signing Certificate for use in Hightouch.
- In the Hightouch modal opened in step 4, enter the Identity Provider Single Sign-On URL and upload the certificate you downloaded. Click Save.
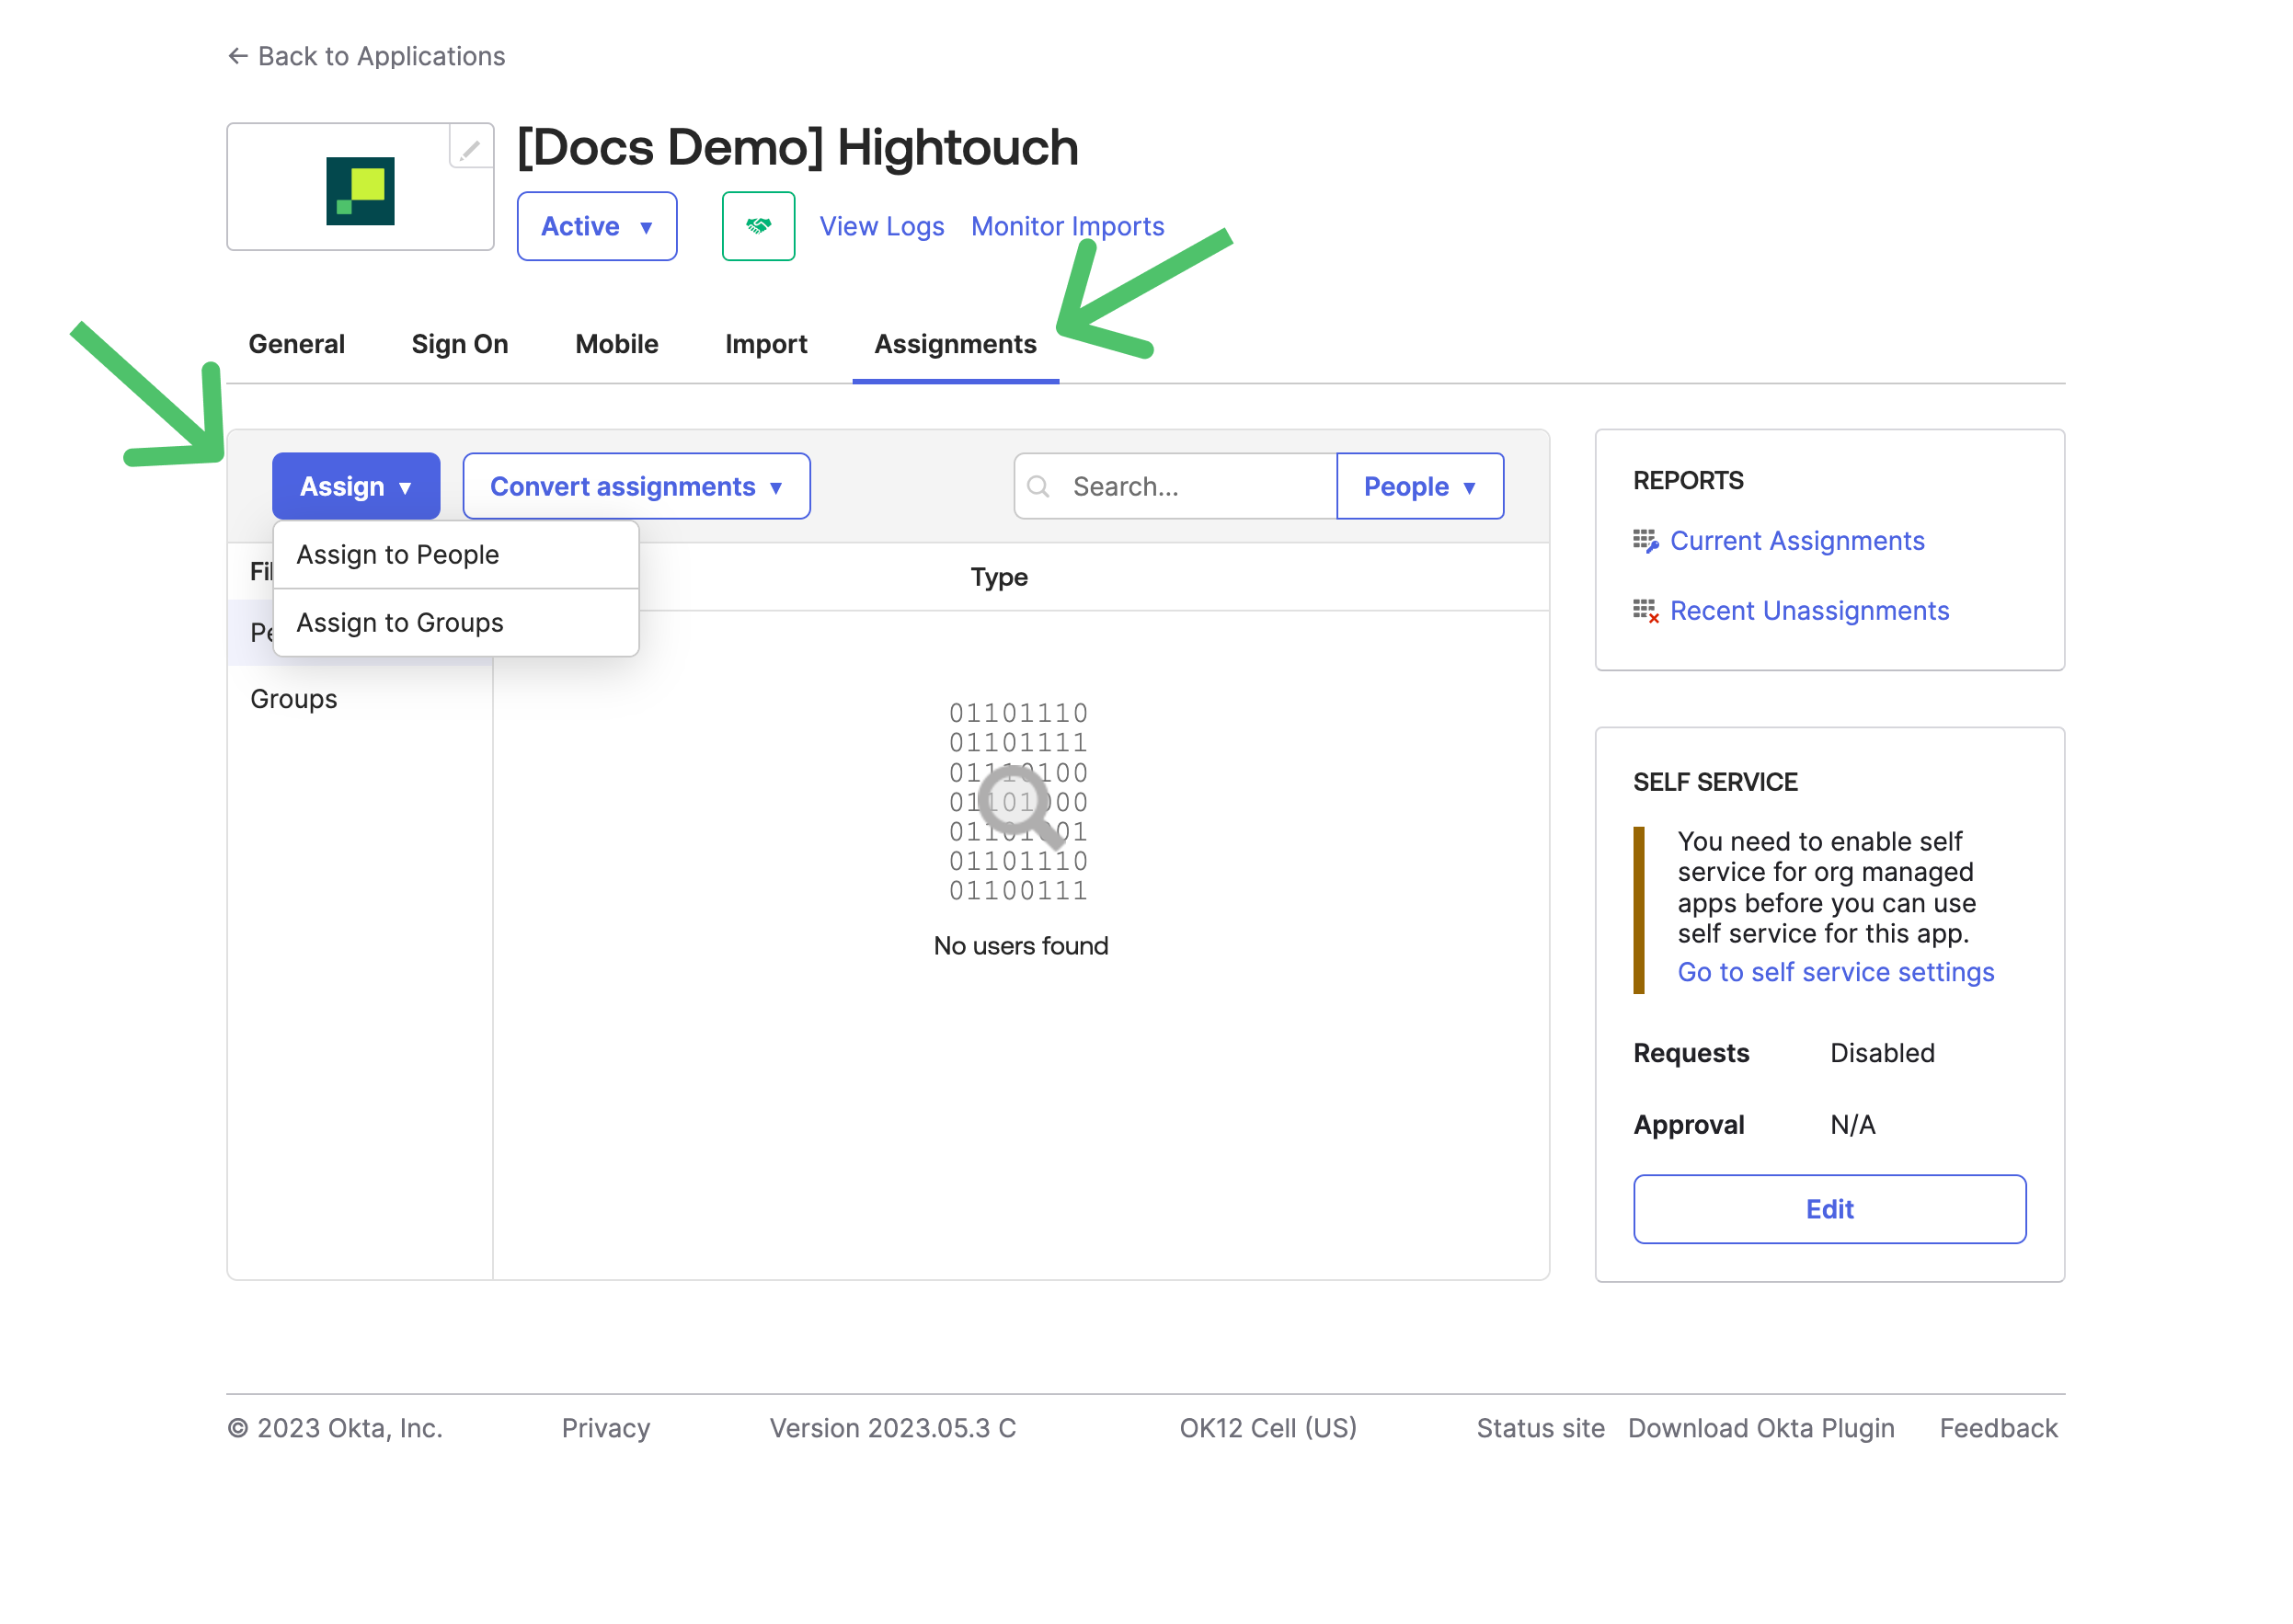
- In Okta, go to the Assignments tab of the Application you created. Assign either individuals or groups so they have access to Hightouch via Okta.
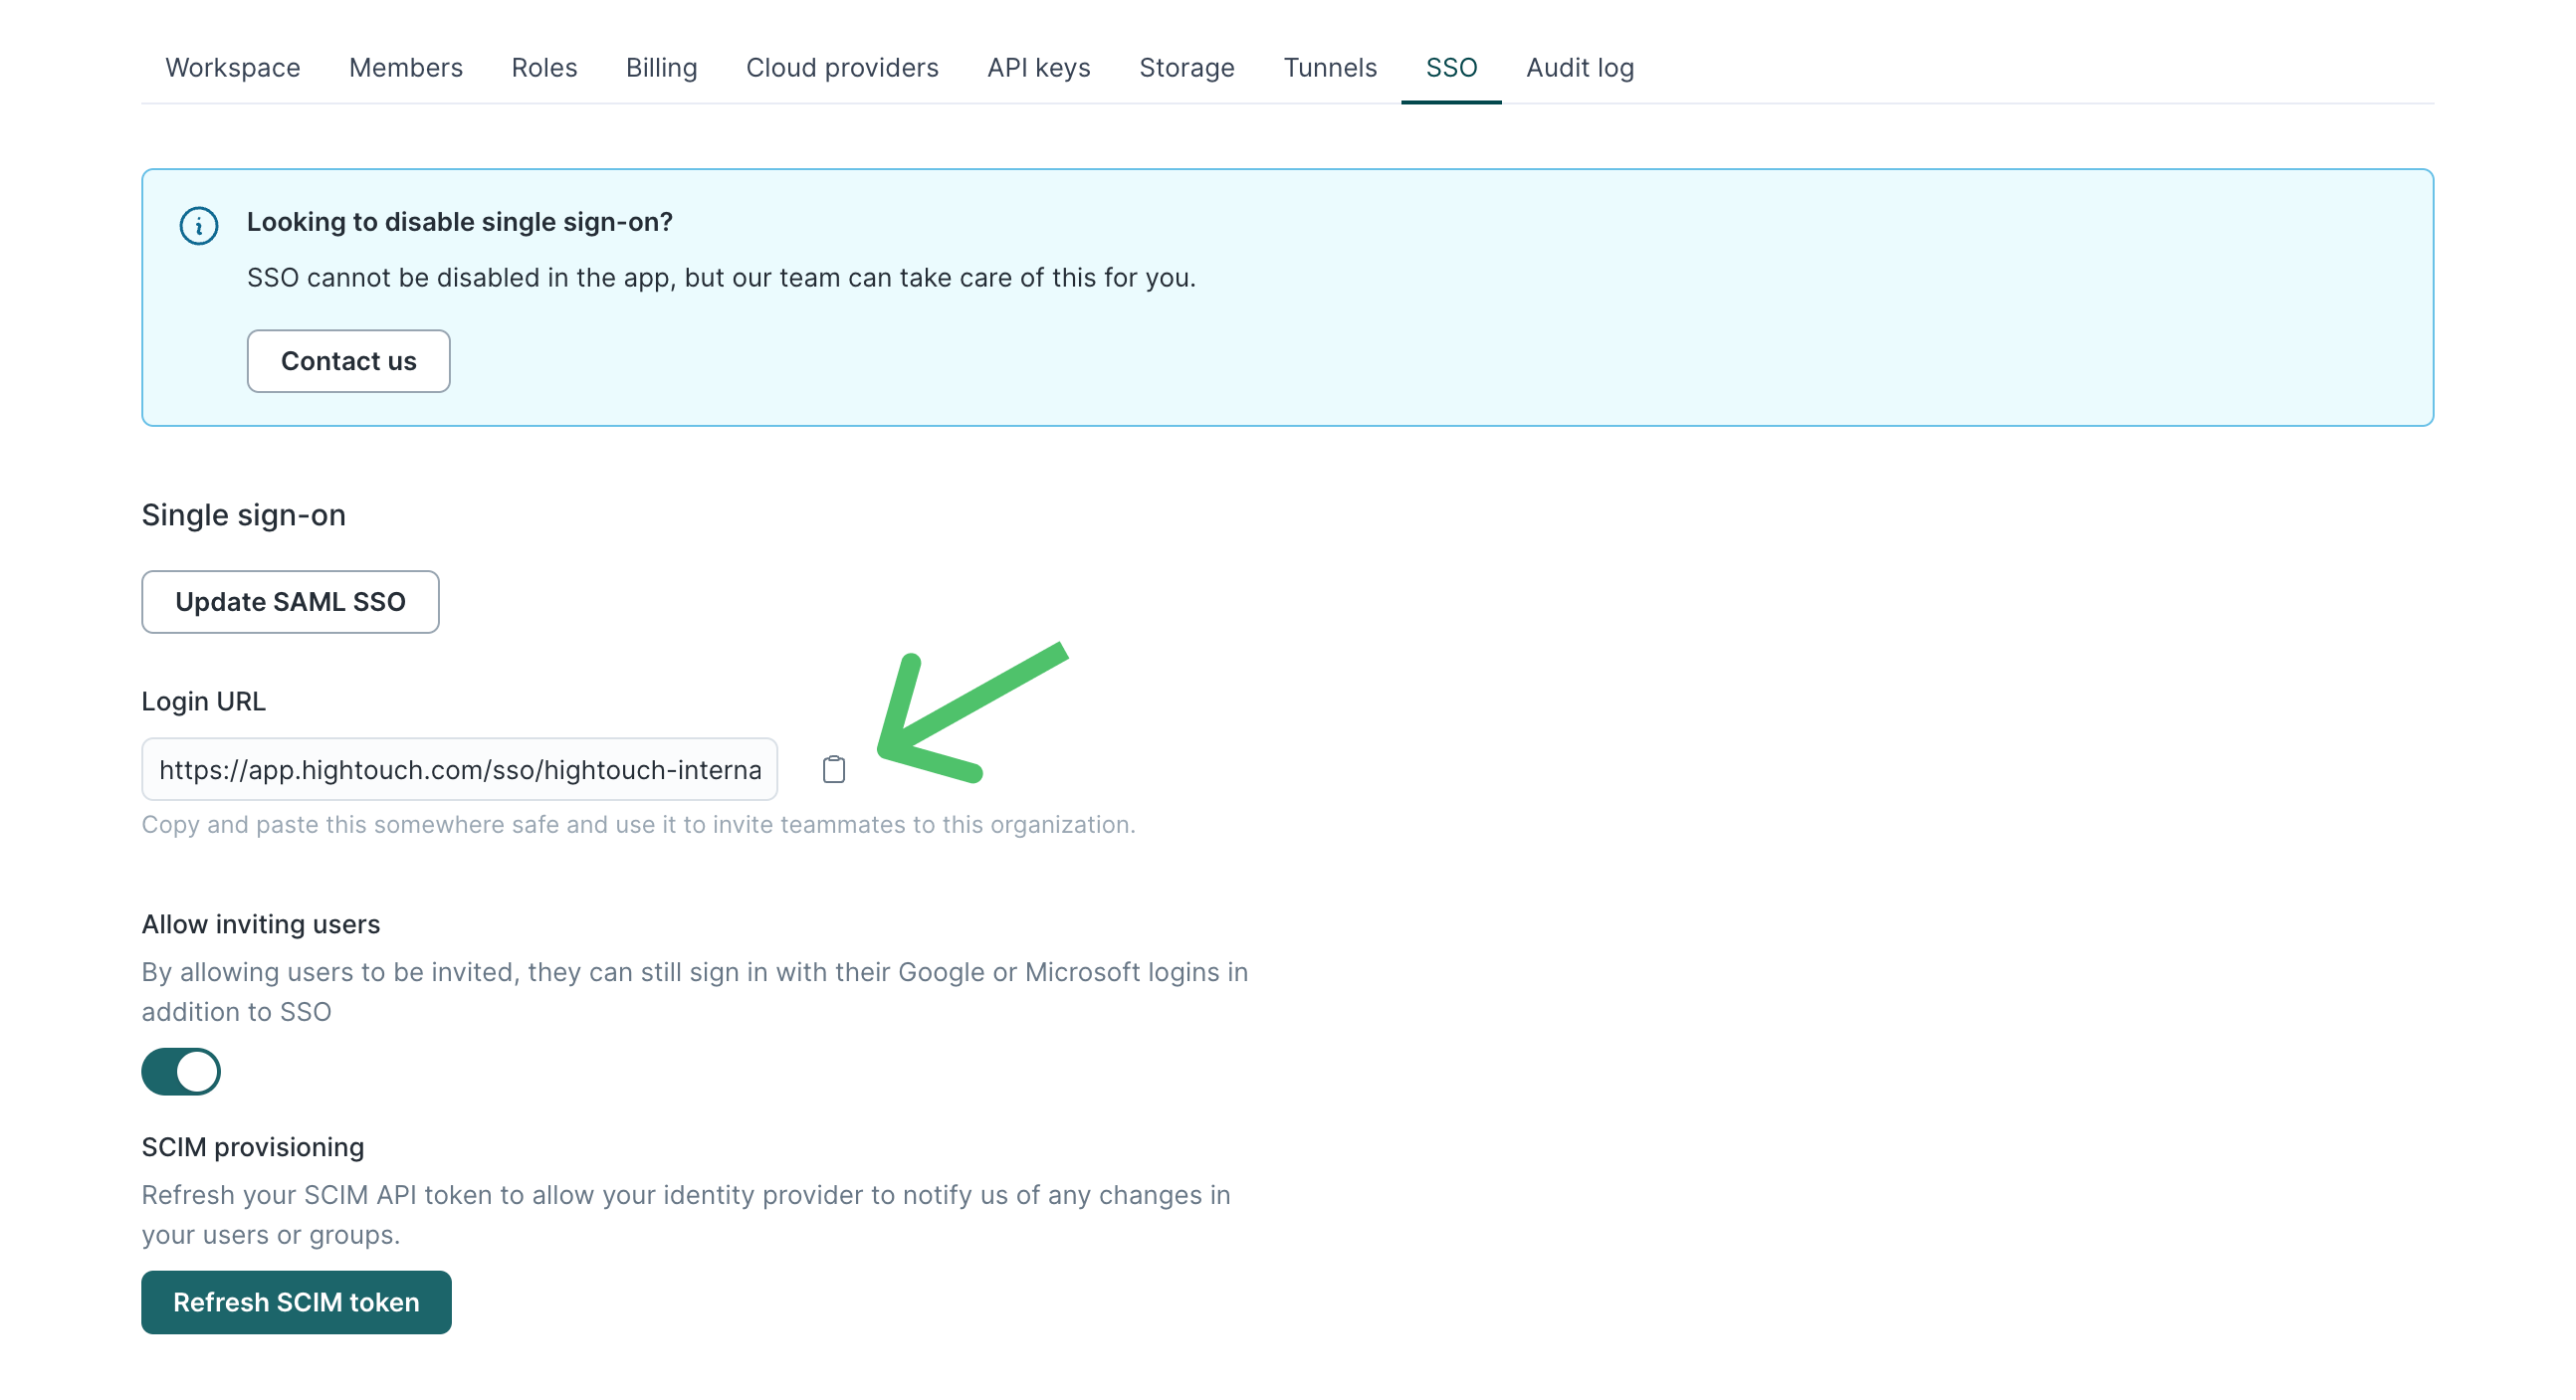
Assigned members of your organization can now select Enterprise Sign-in on the Hightouch login screen to access your workspaces. You can also share your Hightouch workspace with team members by sharing the link under Login URL on the Single sign-on tab on the Settings page.
Microsoft Entra ID SAML SSO configuration
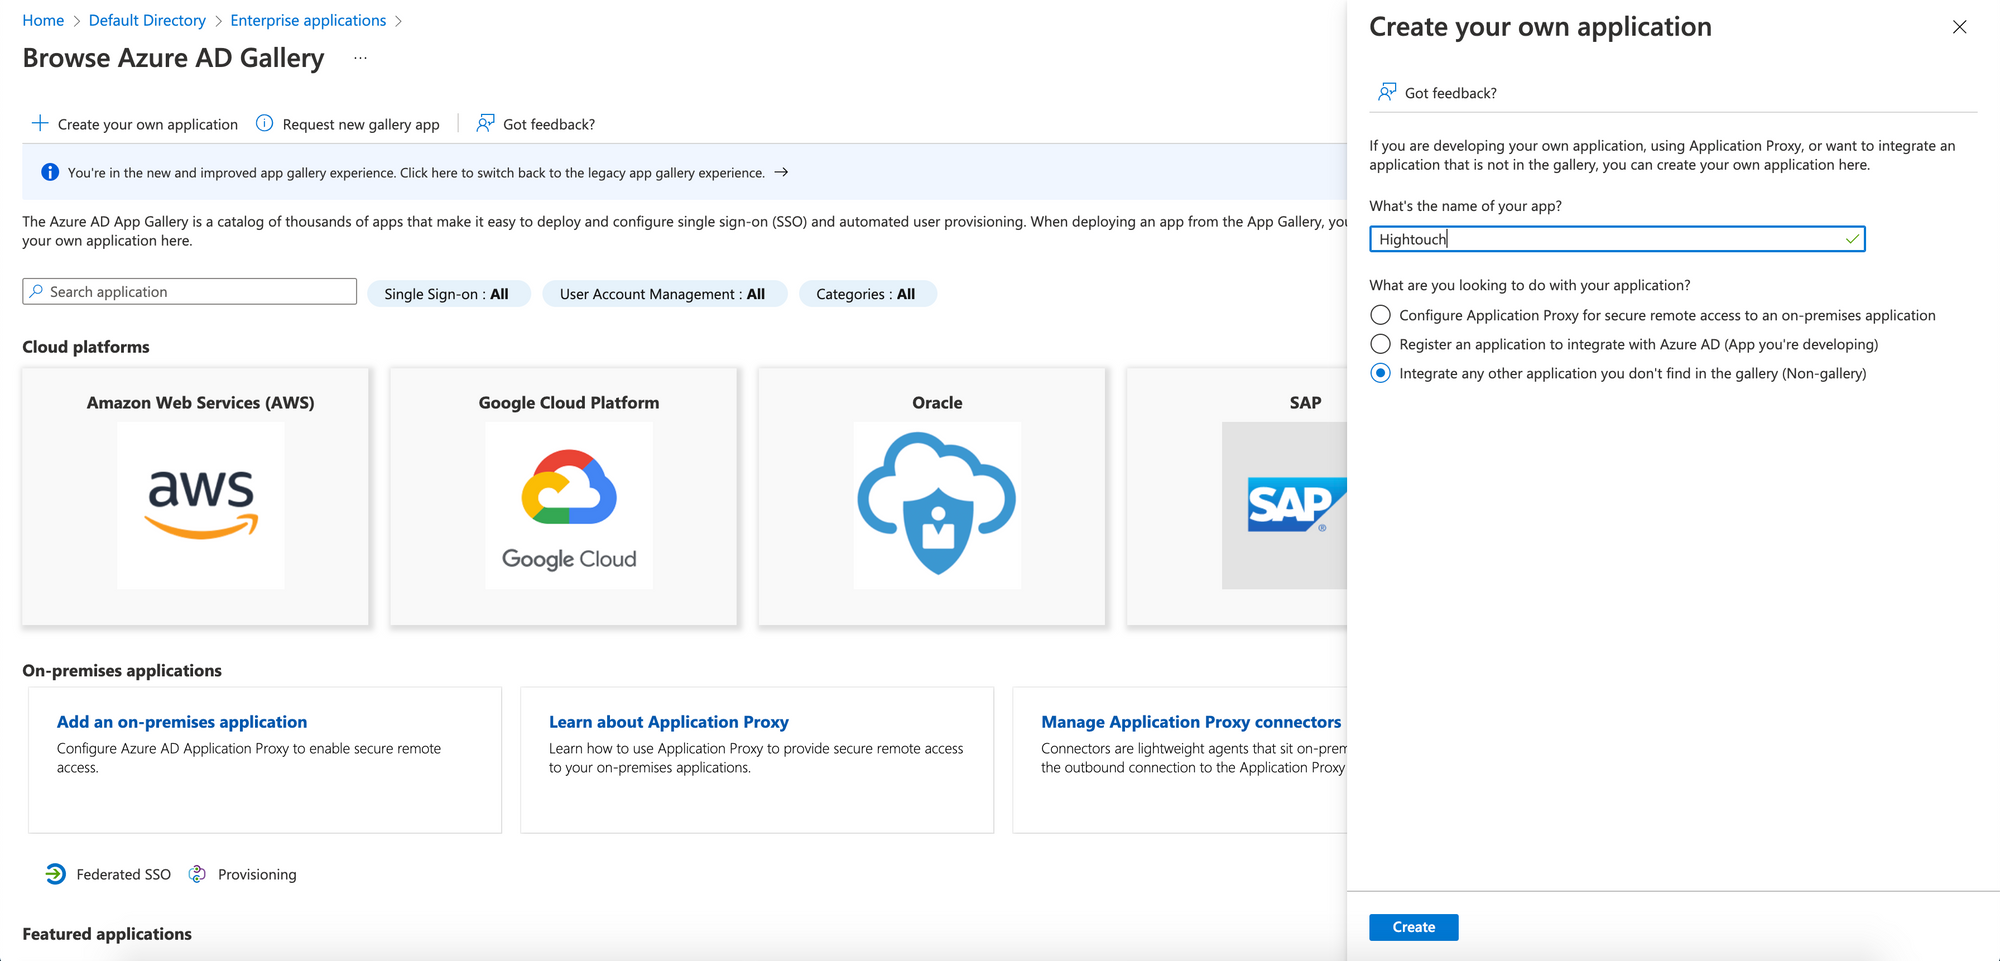
- Navigate to the Microsoft Entra ID gallery and select Create your own application.
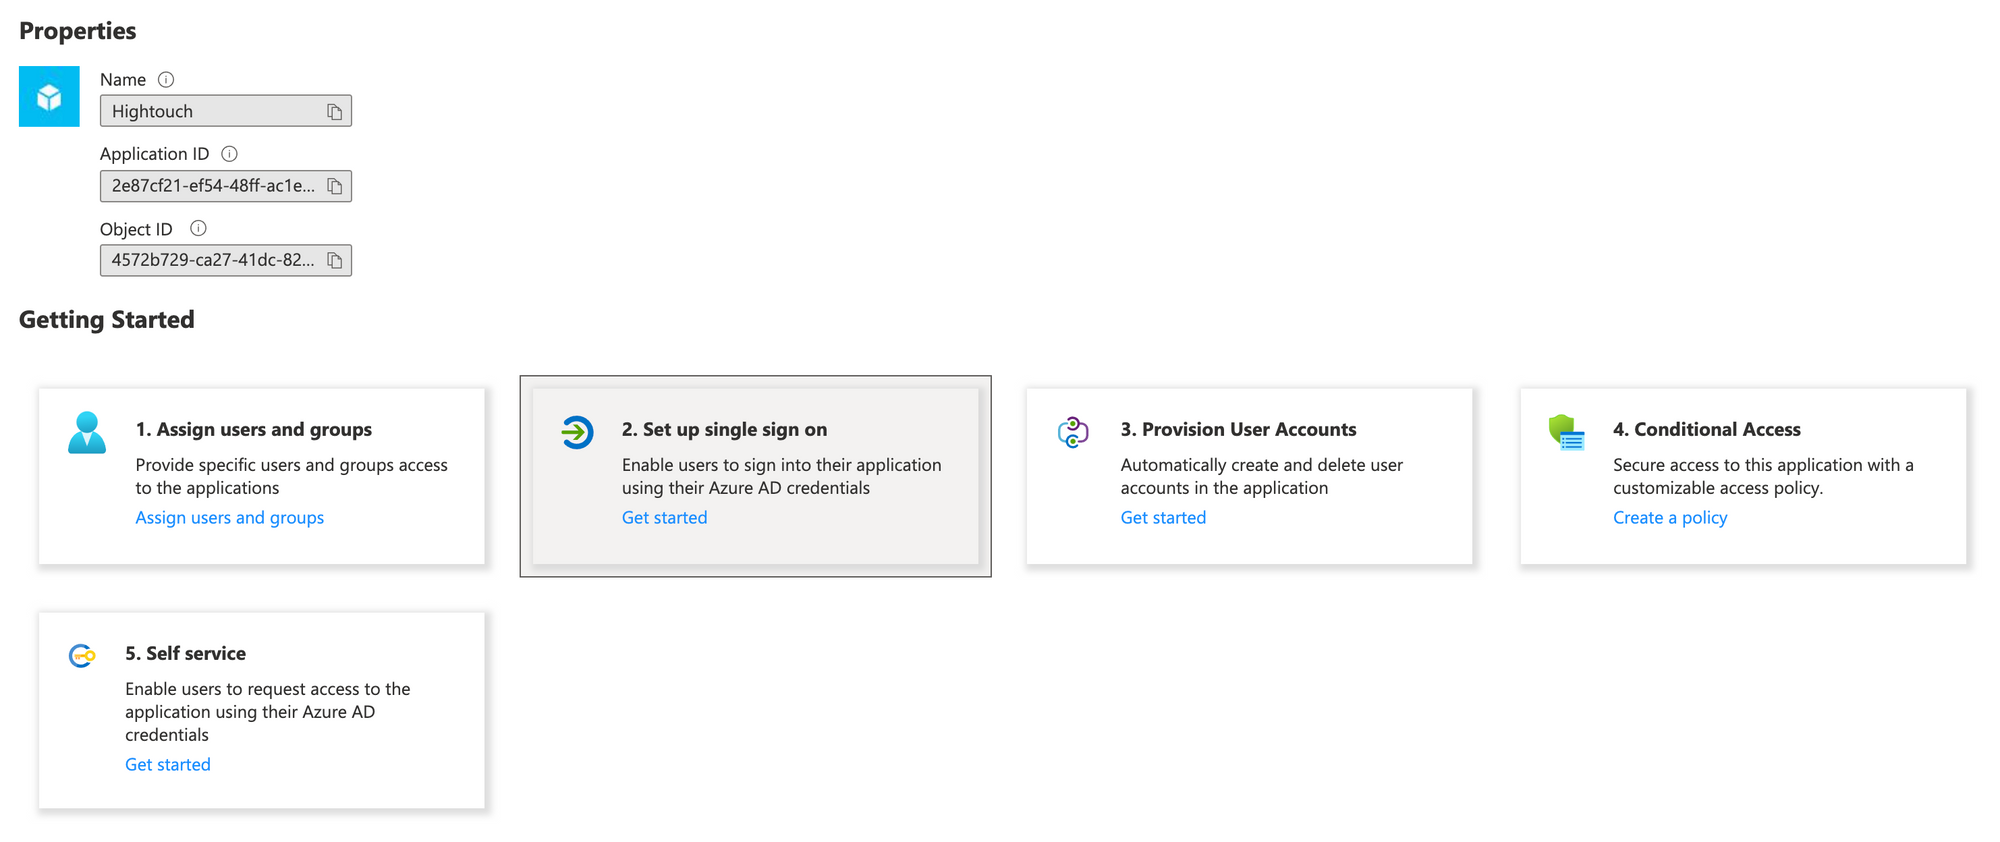
- Select Set up single sign-on in the newly created app.
- Select SAML as your single sign-on method.

- In Hightouch, open the Single sign-on tab on the Settings page. Click Add SAML SSO to open a modal with SAML URL and SAML Audience URL.

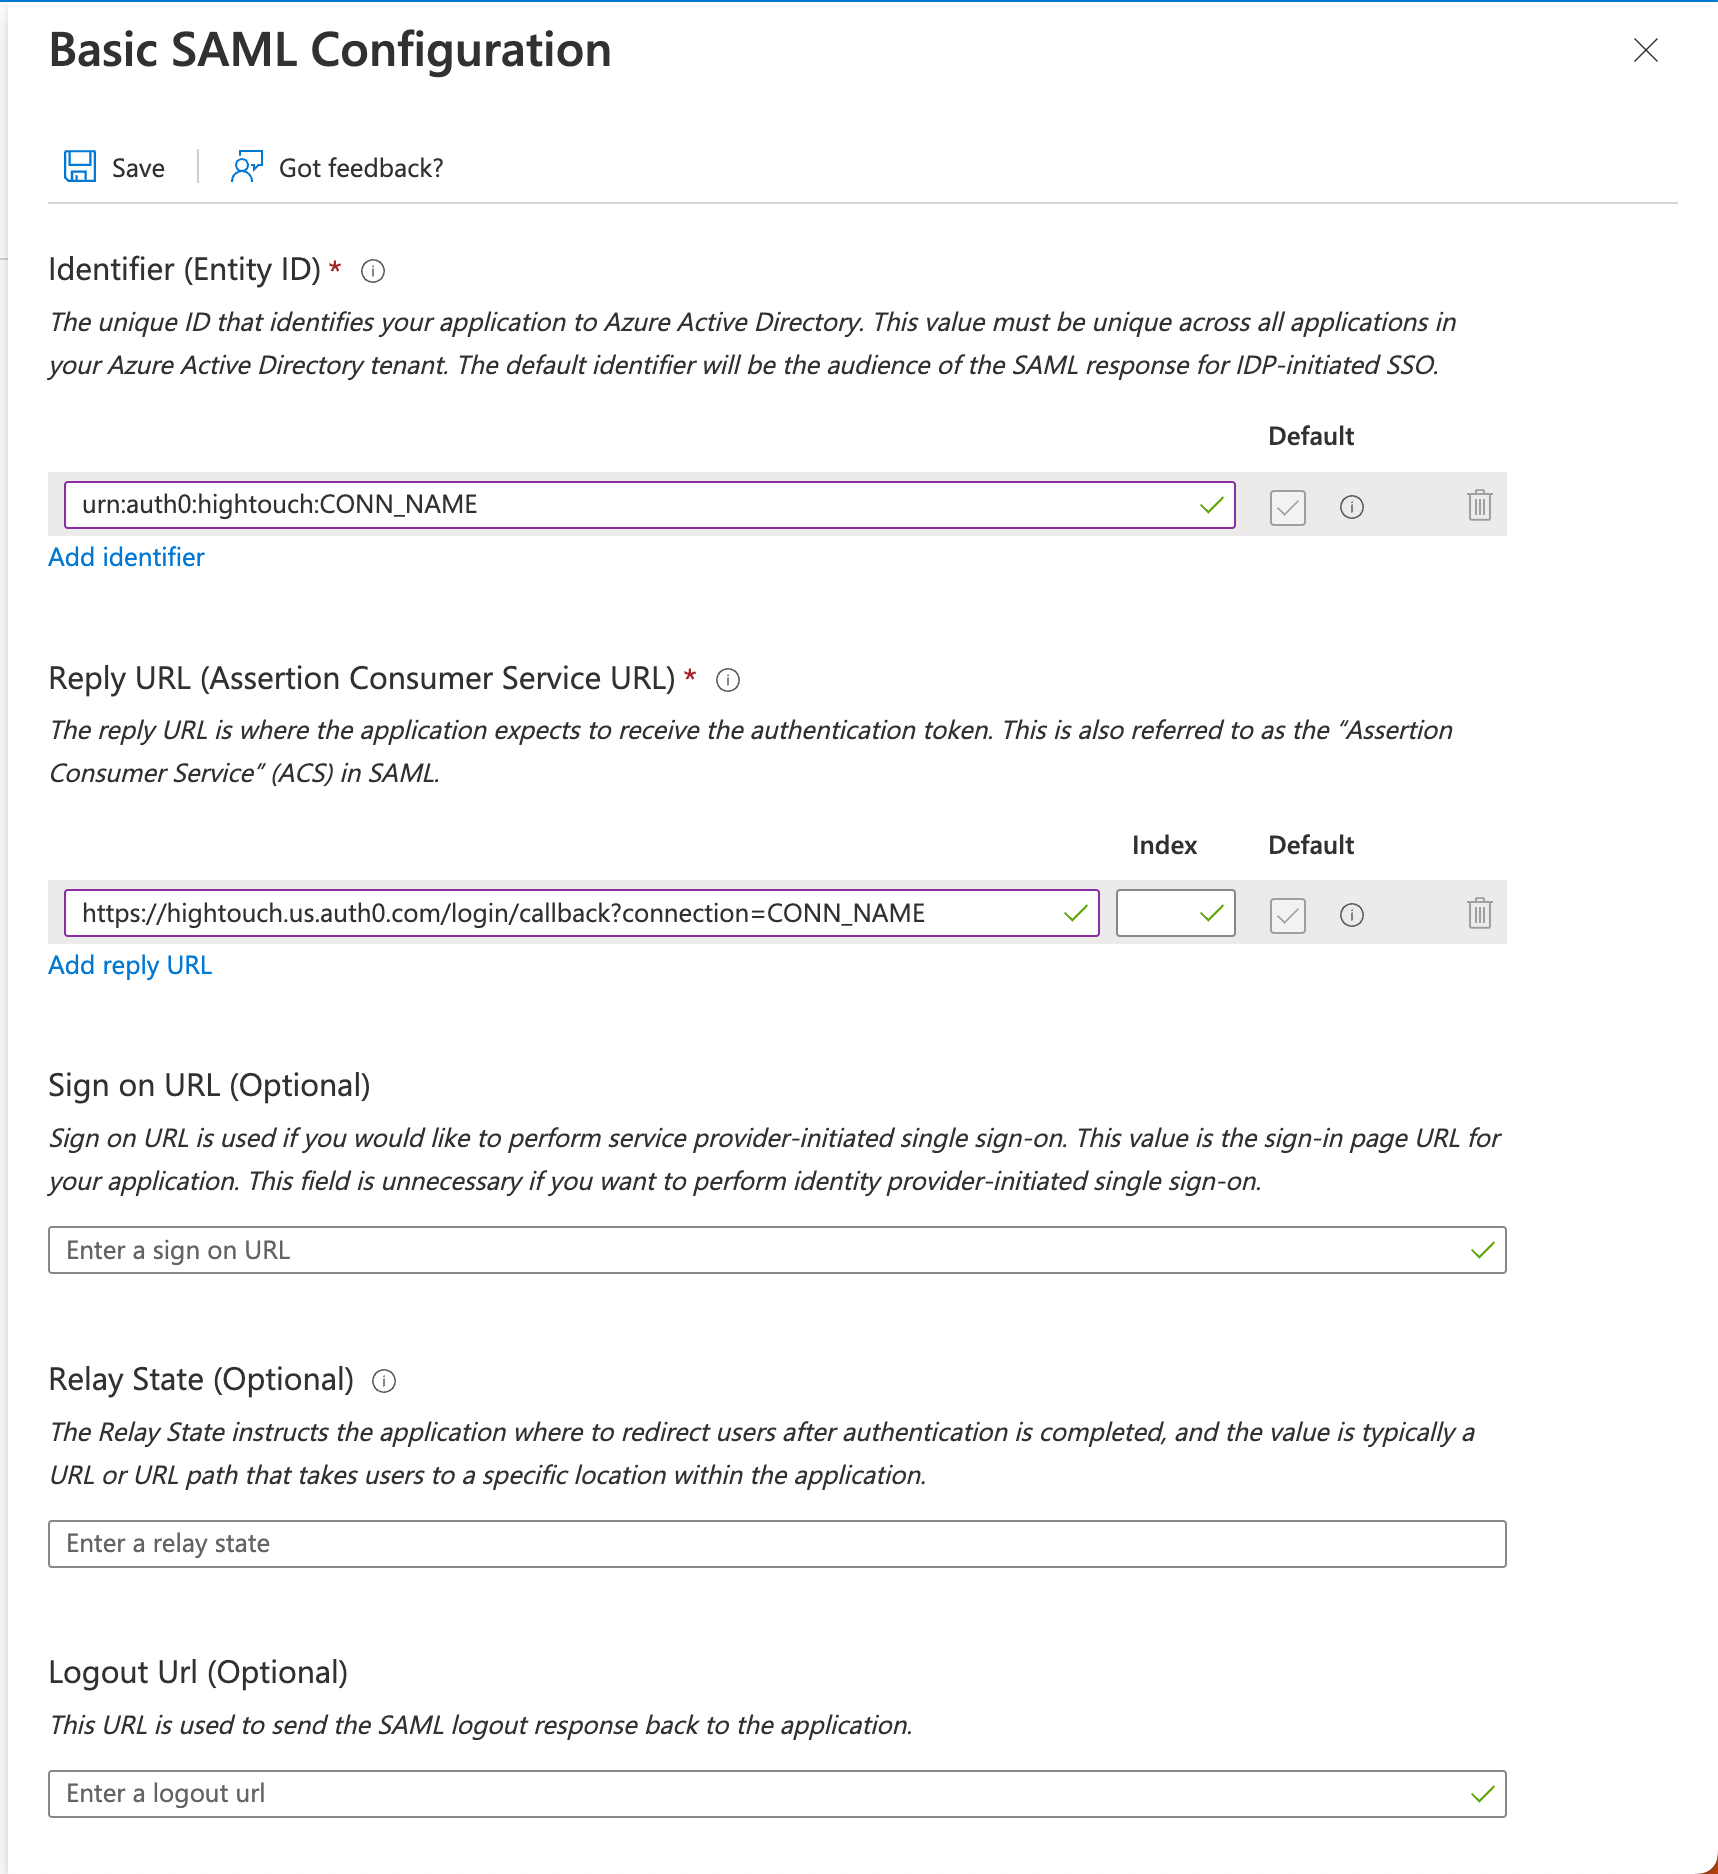
- Configure your SAML Settings in Microsoft Entra ID with the SAML URL and SAML Audience URL shown in the Hightouch modal.
Keep the Sign on URL input empty if you wish to use IDP initiated sign-on.
- In Microsoft Entra ID, set attribute mappings for
nameandemail, if they haven't already been set.
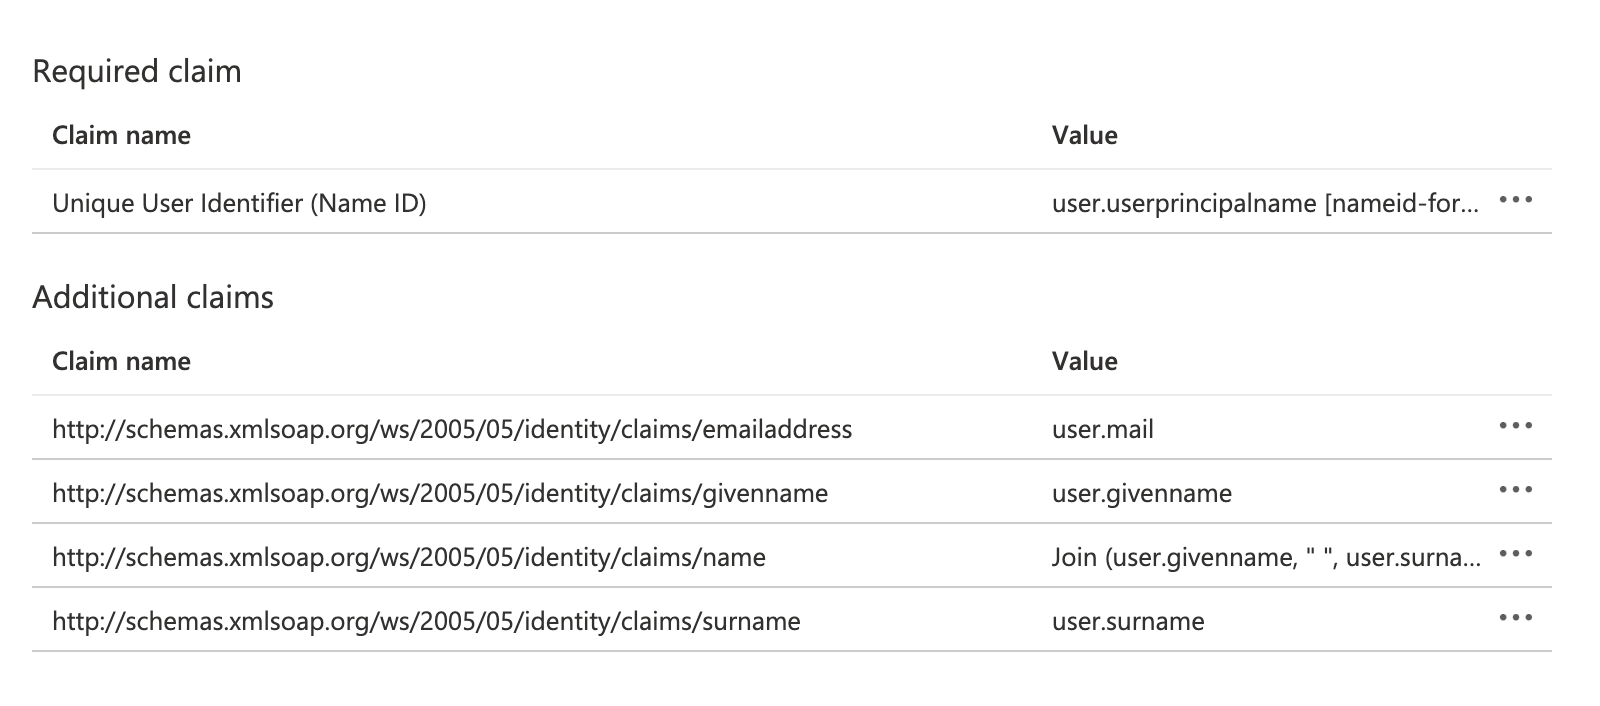
- In the Hightouch modal opened in step 4, enter Microsoft Entra ID's Login URL as the Identity Provider Single Sign-On URL and upload the Certificate Base64 as the x.509 Certificate.
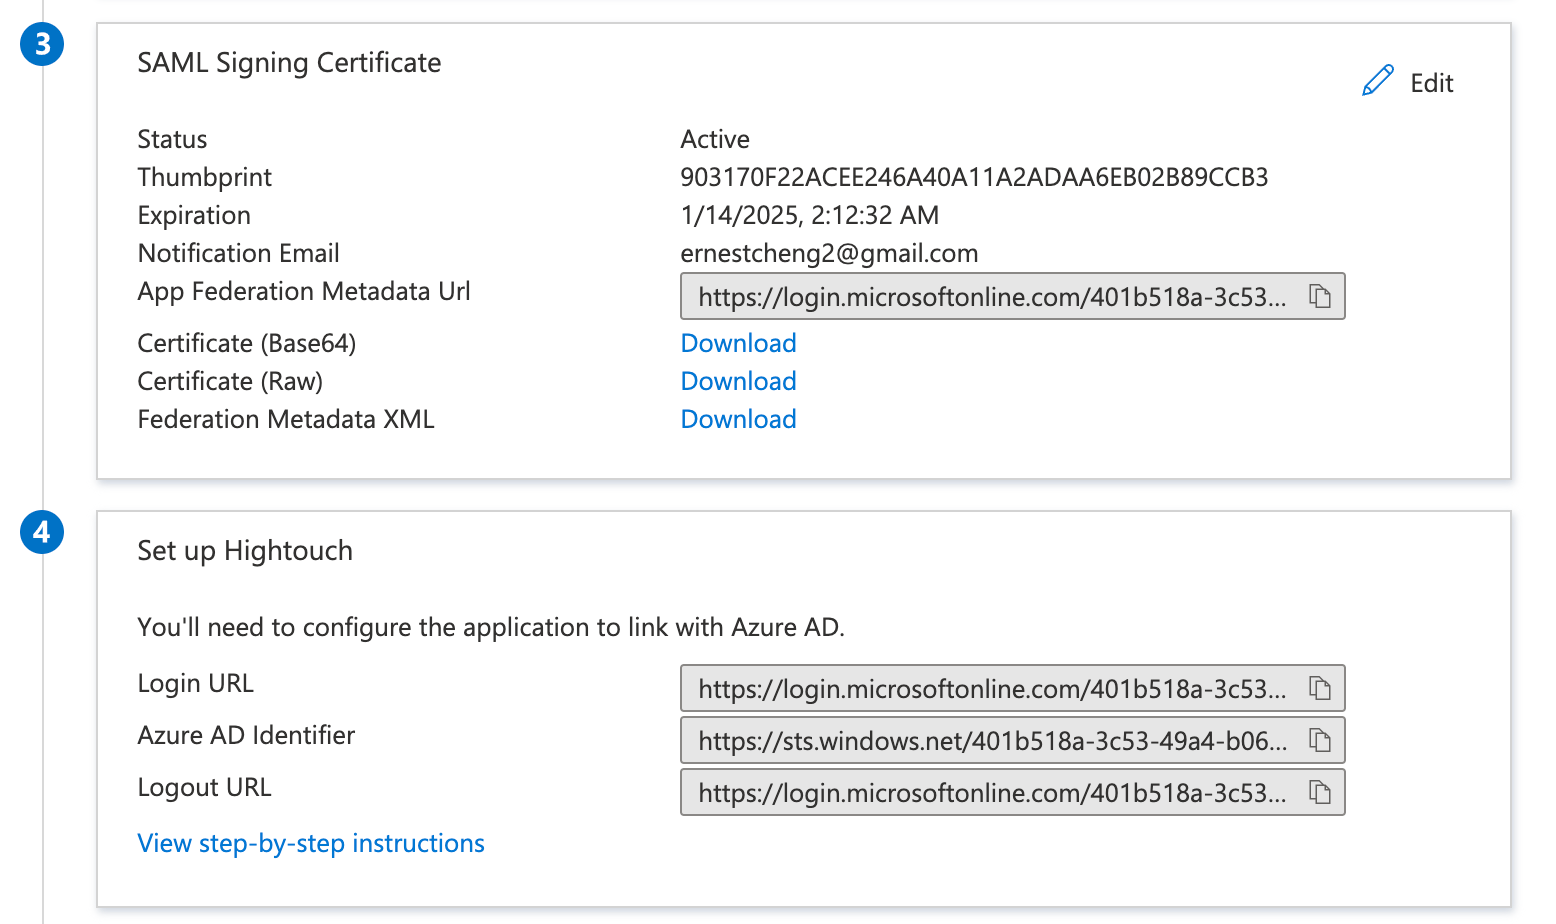
- Click Save.
Members of your organization can now select Enterprise Sign-in on the Hightouch login screen to access your workspaces. You can also share your Hightouch workspace with others in your organization by sharing the link under Copy your Single sign-on login URL on the Single sign-on tab on the Settings page.
Access management with SSO groups
It can be challenging to manually manage multiple users' roles and permissions in a large organization. If you use a third-party identity provider like Okta to manage groups, you can map those groups to the workspaces and roles the user should be assigned in Hightouch.
With SSO groups configured, when a team member signs in to Hightouch with SSO for the first time, Hightouch checks the user's credentials with the identity provider. Once the identity is confirmed, Hightouch assigns the workspaces and roles that the user should have depending on which groups the user belongs to in your identity provider.
If a user belongs to multiple groups in your identity provider, your identity provider only sends Hightouch the SSO group with the highest priority. For example, imagine some users belong to two groups called "Marketing" and "Everyone." If the "Marketing" group has a higher priority than "Everyone" in your identity provider, Hightouch only receives the "Marketing" SSO group for that user, and in turn maps the corresponding role associated in Hightouch.
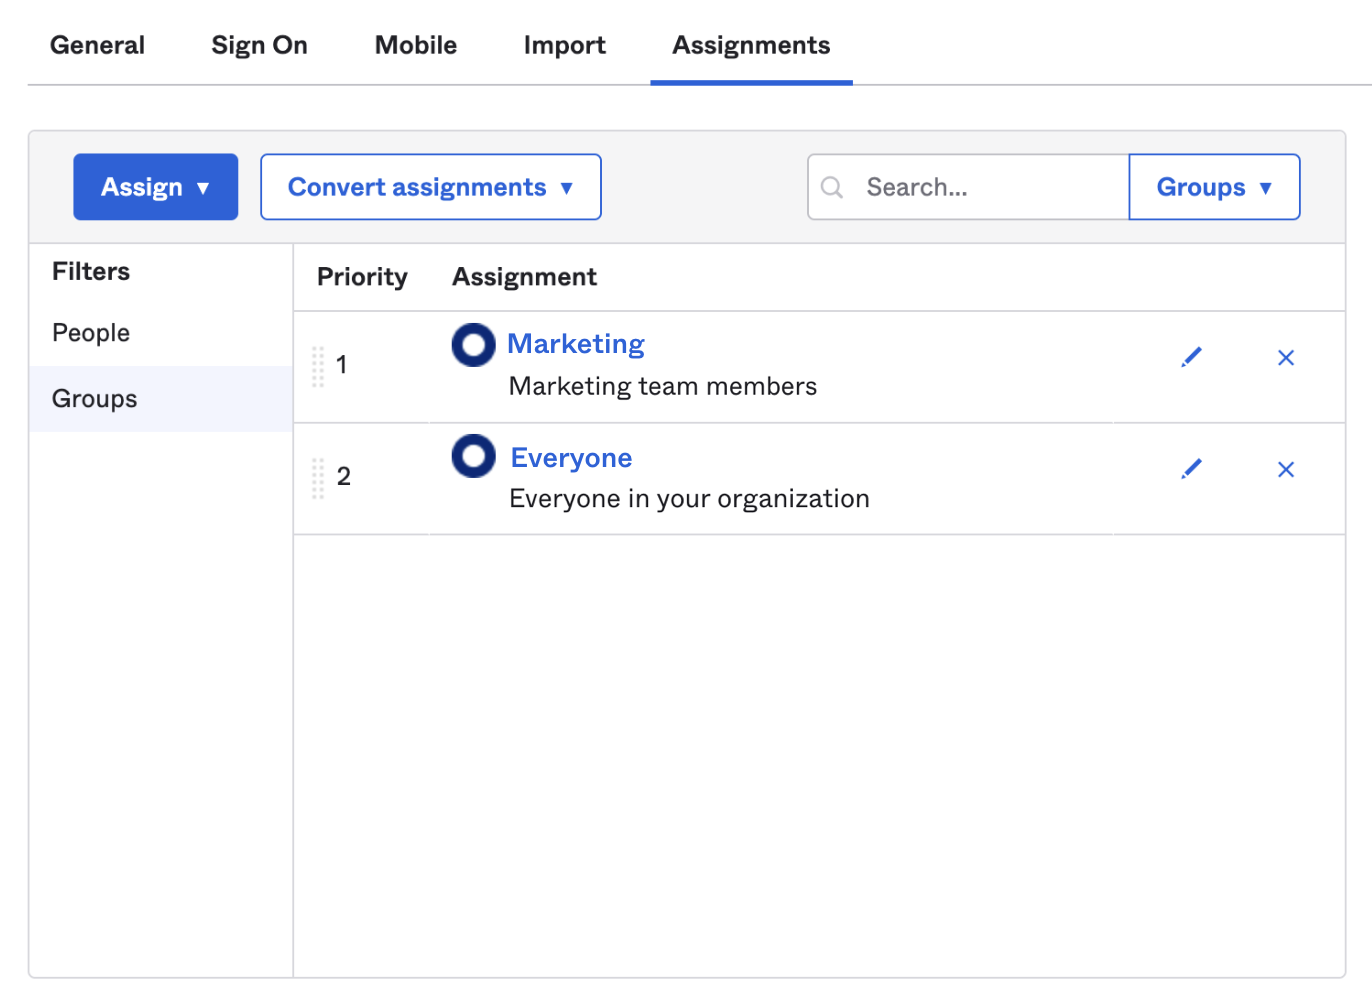
Some SSO identity providers don't support group prioritization, such as Microsoft Entra ID (formerly known as Azure Active Directory). Check with your identity provider to understand their capabilities.
Without SCIM configured, Hightouch applies SSO group changes when a user signs in to their account, not when an identity provider administrator makes changes in the identity provider. Therefore, if using SSO groups without SCIM, a user's Hightouch role is updated after they sign in next, assuming a Hightouch role is mapped to their new group. This also means that an SSO group only appears on the SSO tab if a user who is part of that group logs into your Hightouch workspace via SSO.
Configure SCIM to push updates from your identity provider to Hightouch automatically.
Role assignment
Hightouch assigns user roles in workspaces that have enabled SAML SSO in this way:
- New members are assigned the Hightouch role mapped to the user's group in your identity provider.
- If you don't map the user's group to a Hightouch role, the user is assigned the workspace default role.
- If you don't map the user's group to a Hightouch role and you've disabled using the workspace default role, the users aren't members of those workspaces.
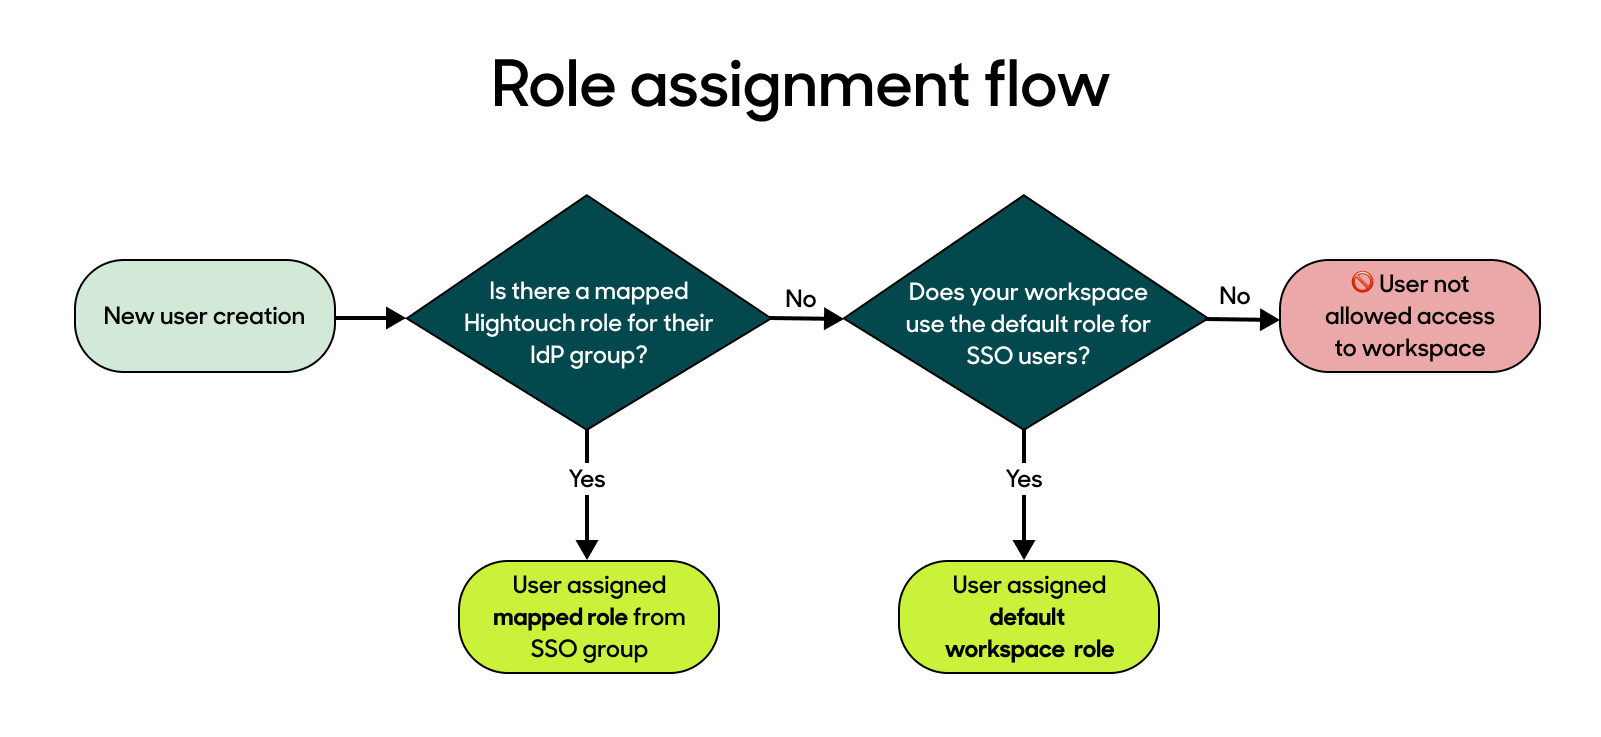
To ensure that users are all assigned their correct Hightouch roles and have the appropriate permissions, it's best to map your SAML groups to Hightouch roles in your SSO settings.
Okta SSO group setup
You must configure SAML SSO before configuring SSO groups.
If you're using Microsoft Entra ID (formerly known as Azure Active Directory), refer to the Microsoft Entra ID SSO group setup section below.
- In your Hightouch application in your identity provider, configure the group attribute with the name
groupsso your identity provider includes user groups when logging in to Hightouch.
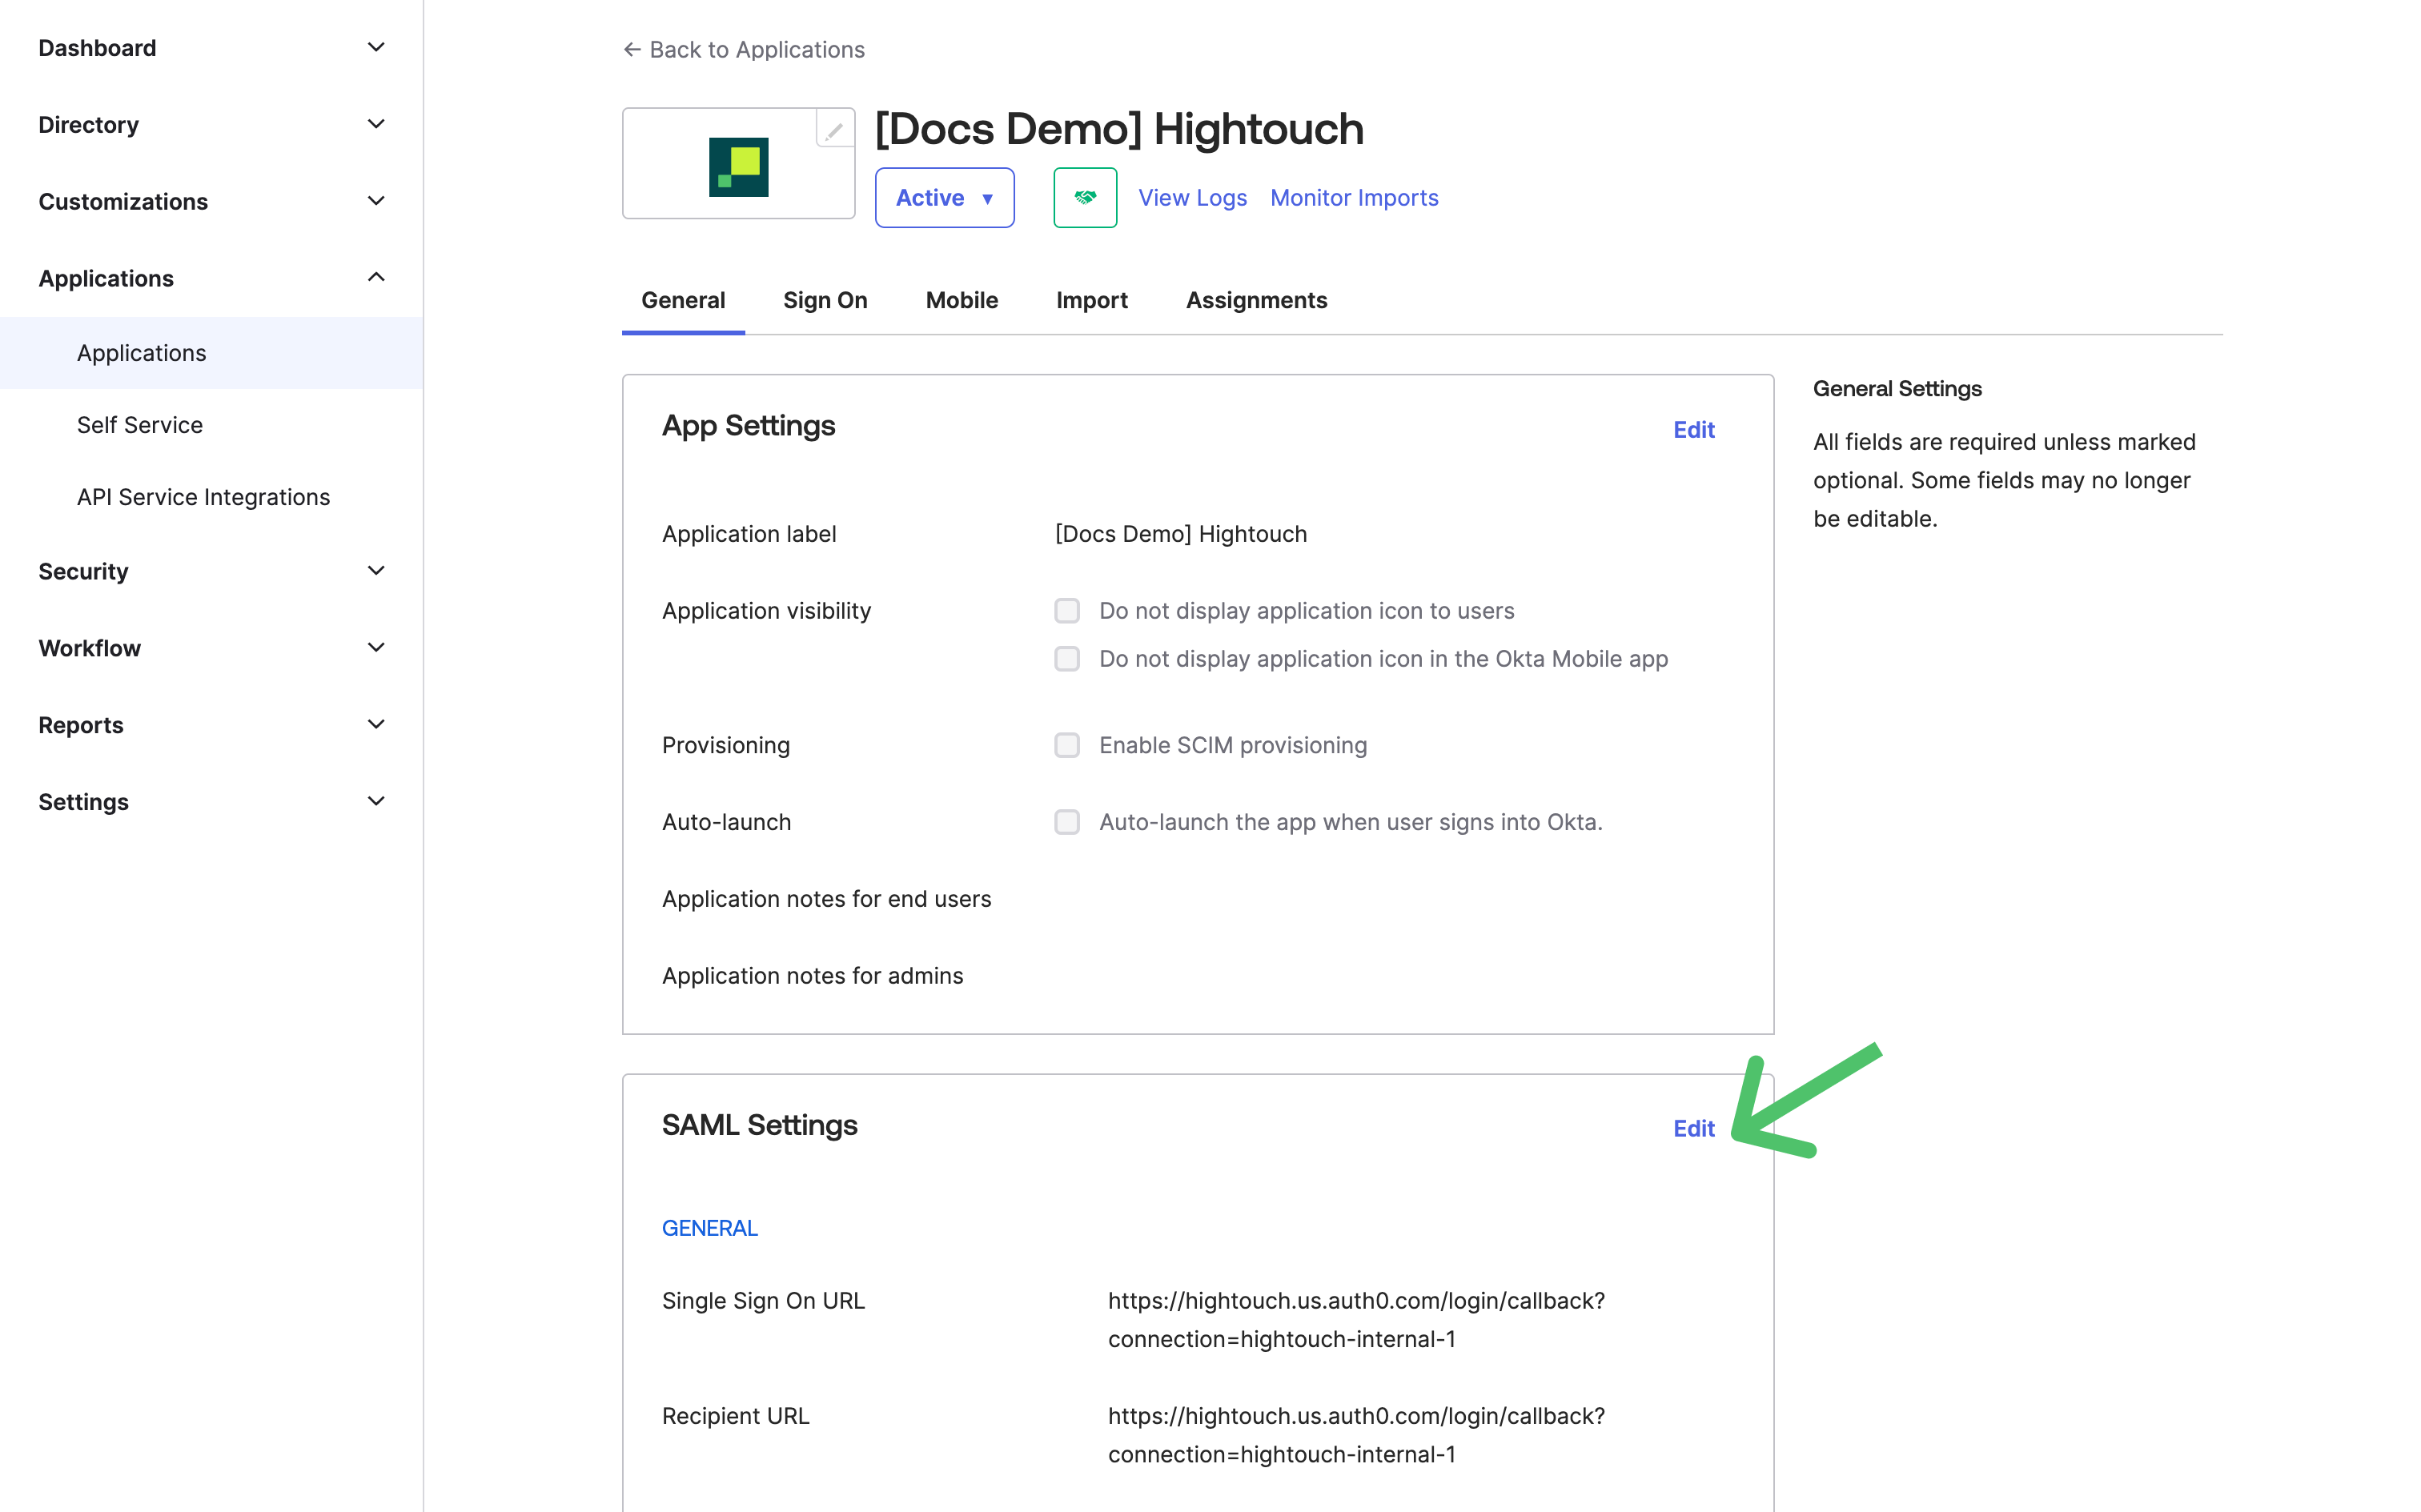
For example, in Okta, go to the General tab of your application and select to edit SAML Settings to open your applications settings.
- Find the Group Attribute Settings by going to Configure SAML and scrolling to the bottom of SAML Settings.
Set the group attribute Name to
groups.
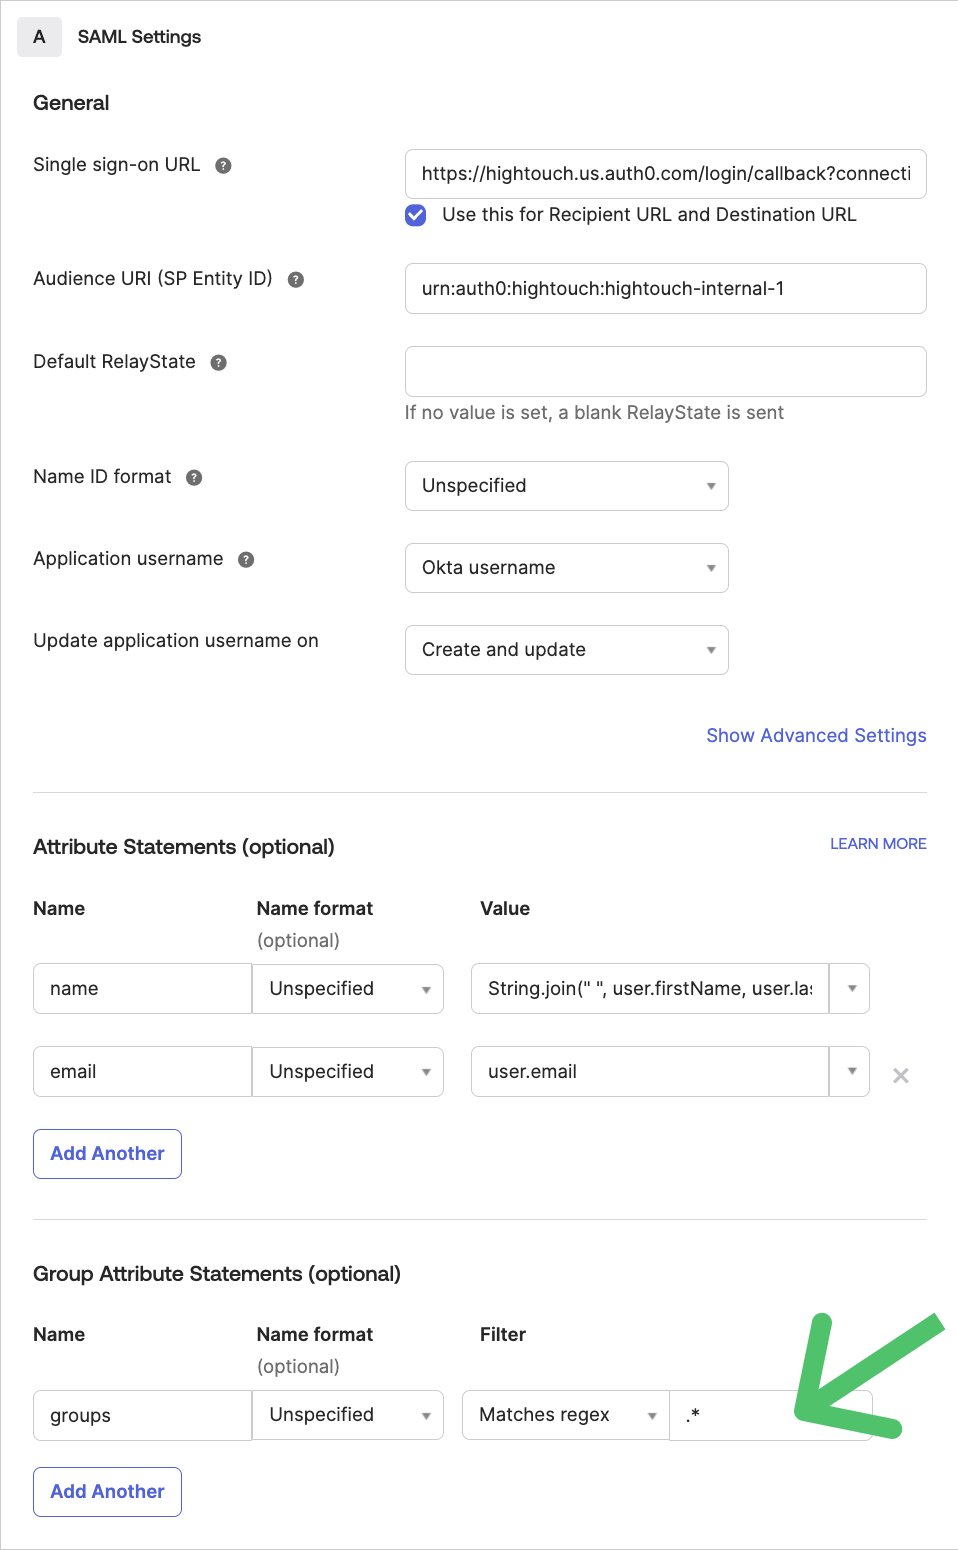
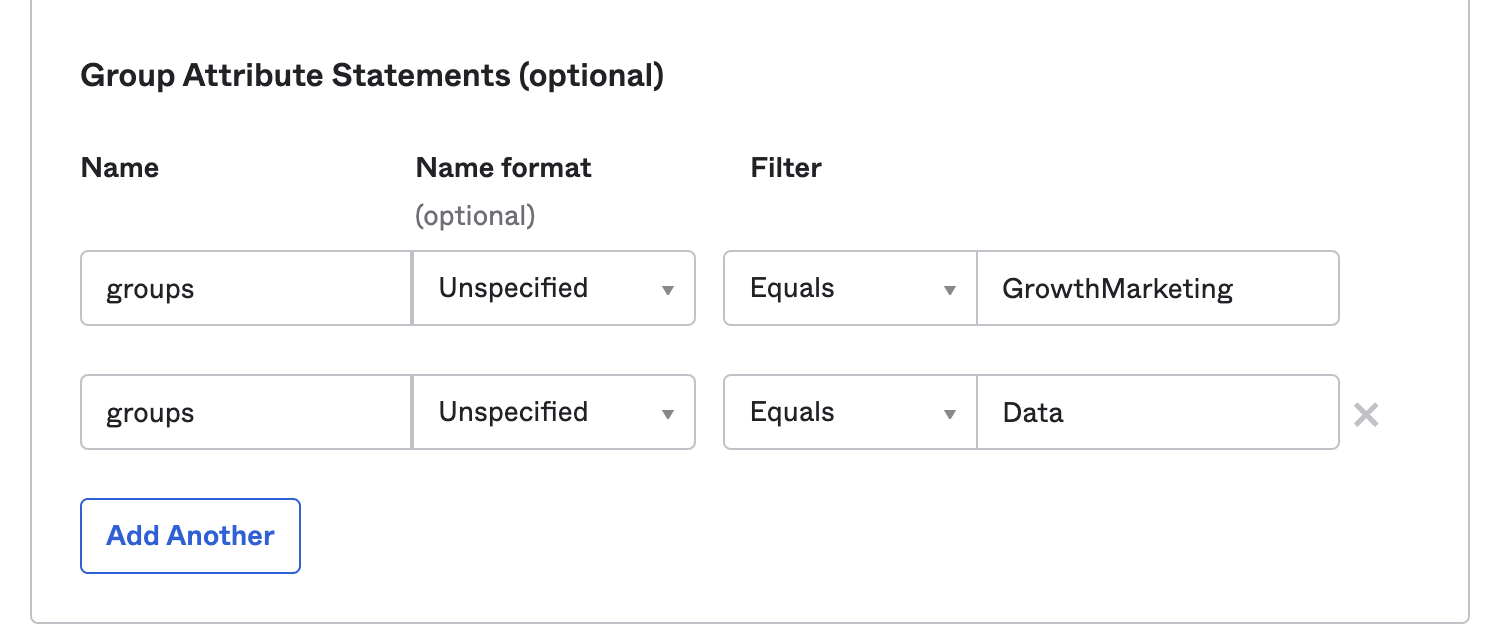
- Select the appropriate Filter for the group attribute statement. The preceding screenshot shows the filter as Matches regex .*. This filter populates all Okta groups to Hightouch for role mapping. You may want to only send certain groups to Hightouch and you should select your filters appropriately. For example you could a Starts with Hightouch- filter to only send group whose names begin with "Hightouch-," or you could add group names individually:
- Confirm users are members of the correct groups and that groups are correctly prioritized.
- In Hightouch, open the Single sign-on tab on the Settings page.
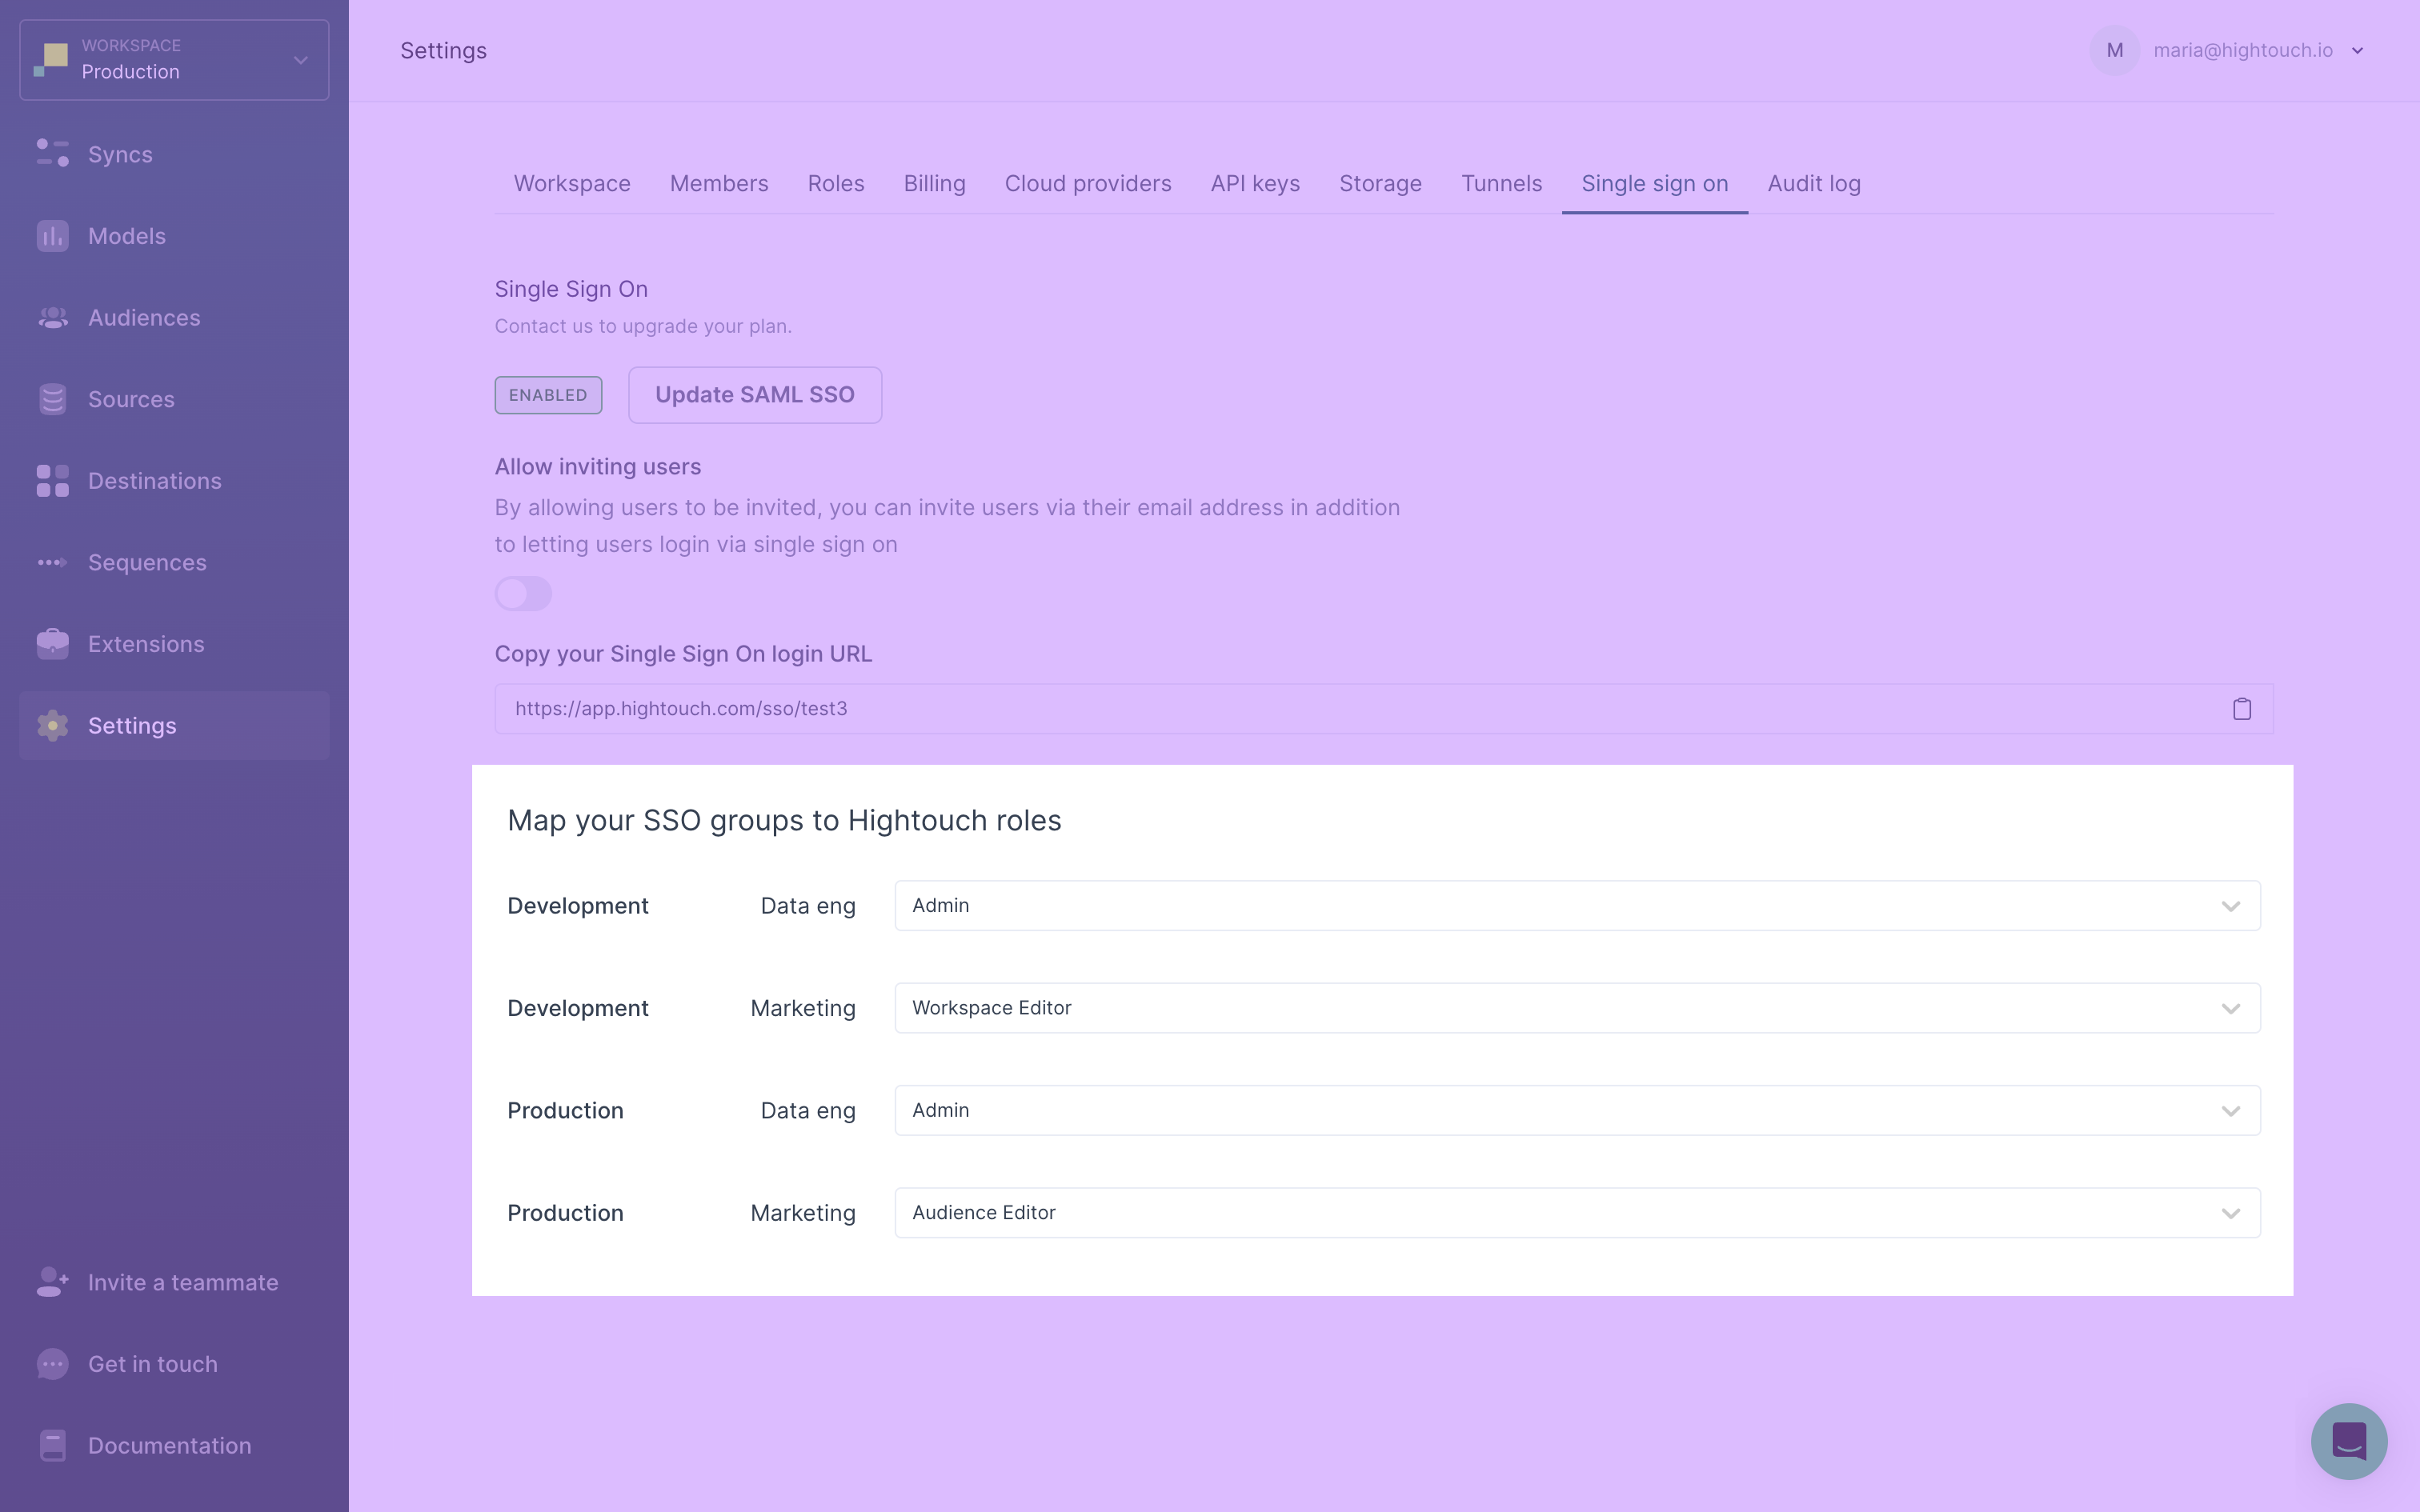
- Under Map your SSO groups to Hightouch roles, you can see the list of groups from your identity provider. The list is replicated for each workspace so that one row represents that group's role in the respective workspace. For each group, select the Hightouch role that group members should be assigned from the dropdown. If you don't select a role for a group, Hightouch uses the default role for that workspace, unless you've disabled this setting.
- Click Save.
- (Optional) You can disable using the workspace default role by going to the Settings page and toggling Use default role for SSO users off. By turning the setting off, single sign-on users must have their identity provider group mapped to a Hightouch role. Without a role mapping for their group, they won't have access to the workspace.
Microsoft Entra ID SSO group setup
- Open Enterprise Applications and select the Single sign on application you created earlier
- Select Single Sign On configuration and then User Attributes & Claims
- Click Add a group claim
- Select Groups assigned to the application
- Select Group ID as the Source attribute
If you want the group to include the group display name for cloud-only groups, select Cloud-only group display names as the Source attribute.
You can learn more about this setup in Microsoft's documentation.
Automatic provisioning via SCIM
You must configure SAML SSO before configuring SCIM. Though it's not necessary, we also recommend configuring SSO groups in addition to SCIM.
When you configure SAML SSO with Hightouch, users are created and updated manually each time they log in to Hightouch.
To make user identity management easier, you can opt-in to automatic provisioning with SCIM. SCIM stands for "System for Cross-domain Identity Management" and is a specification for automating user identity update between cloud-based applications.
Using SCIM, changes in your identity provider are automatically pushed to Hightouch, including activating, updating, and deactivating users.
You need a Hightouch SCIM API token and the Hightouch SCIM URL to configure automatic provisioning.
Generate a SCIM API token
To generate a new SCIM API token:
- Go to the SSO tab in Hightouch.
- Click Generate SCIM token.
- Copy the generated token and keep it safe, for example, using a secrets or password manager.
- Click Create API key. The API key isn't active until you click this button.
Hightouch only displays the SCIM token when you first generate it. Once the modal closes, you won't be able to access it again. If you don't copy the token when you first generate it, you need to refresh the token to get a new one.
You should use this token as a Bearer authentication token when enabling your SCIM integration.
Set up SCIM in your identity provider
The Hightouch SCIM URL is https://api.hightouch.com/api/scim/v2.
Hightouch uses the unique identifier field for users as userName.
Hightouch supports the following provisioning actions:
- Import new users
- Update user profiles
- Push new users
- Push profile updates
- Push groups
If you're using Okta as your identity provider, you can follow their SCIM documentation to complete the set up process. When choosing your provisioning options, be sure to enable all options (creating users, updating user attributes, deactiviating users) to send Hightouch all relevant updates.
If you're using a different identity provider, search for their instructions to configure SCIM.
If you're using Microsoft Entra ID (formerly known as Azure Active Directory), refer to Microsoft's documentation to configure SCIM.
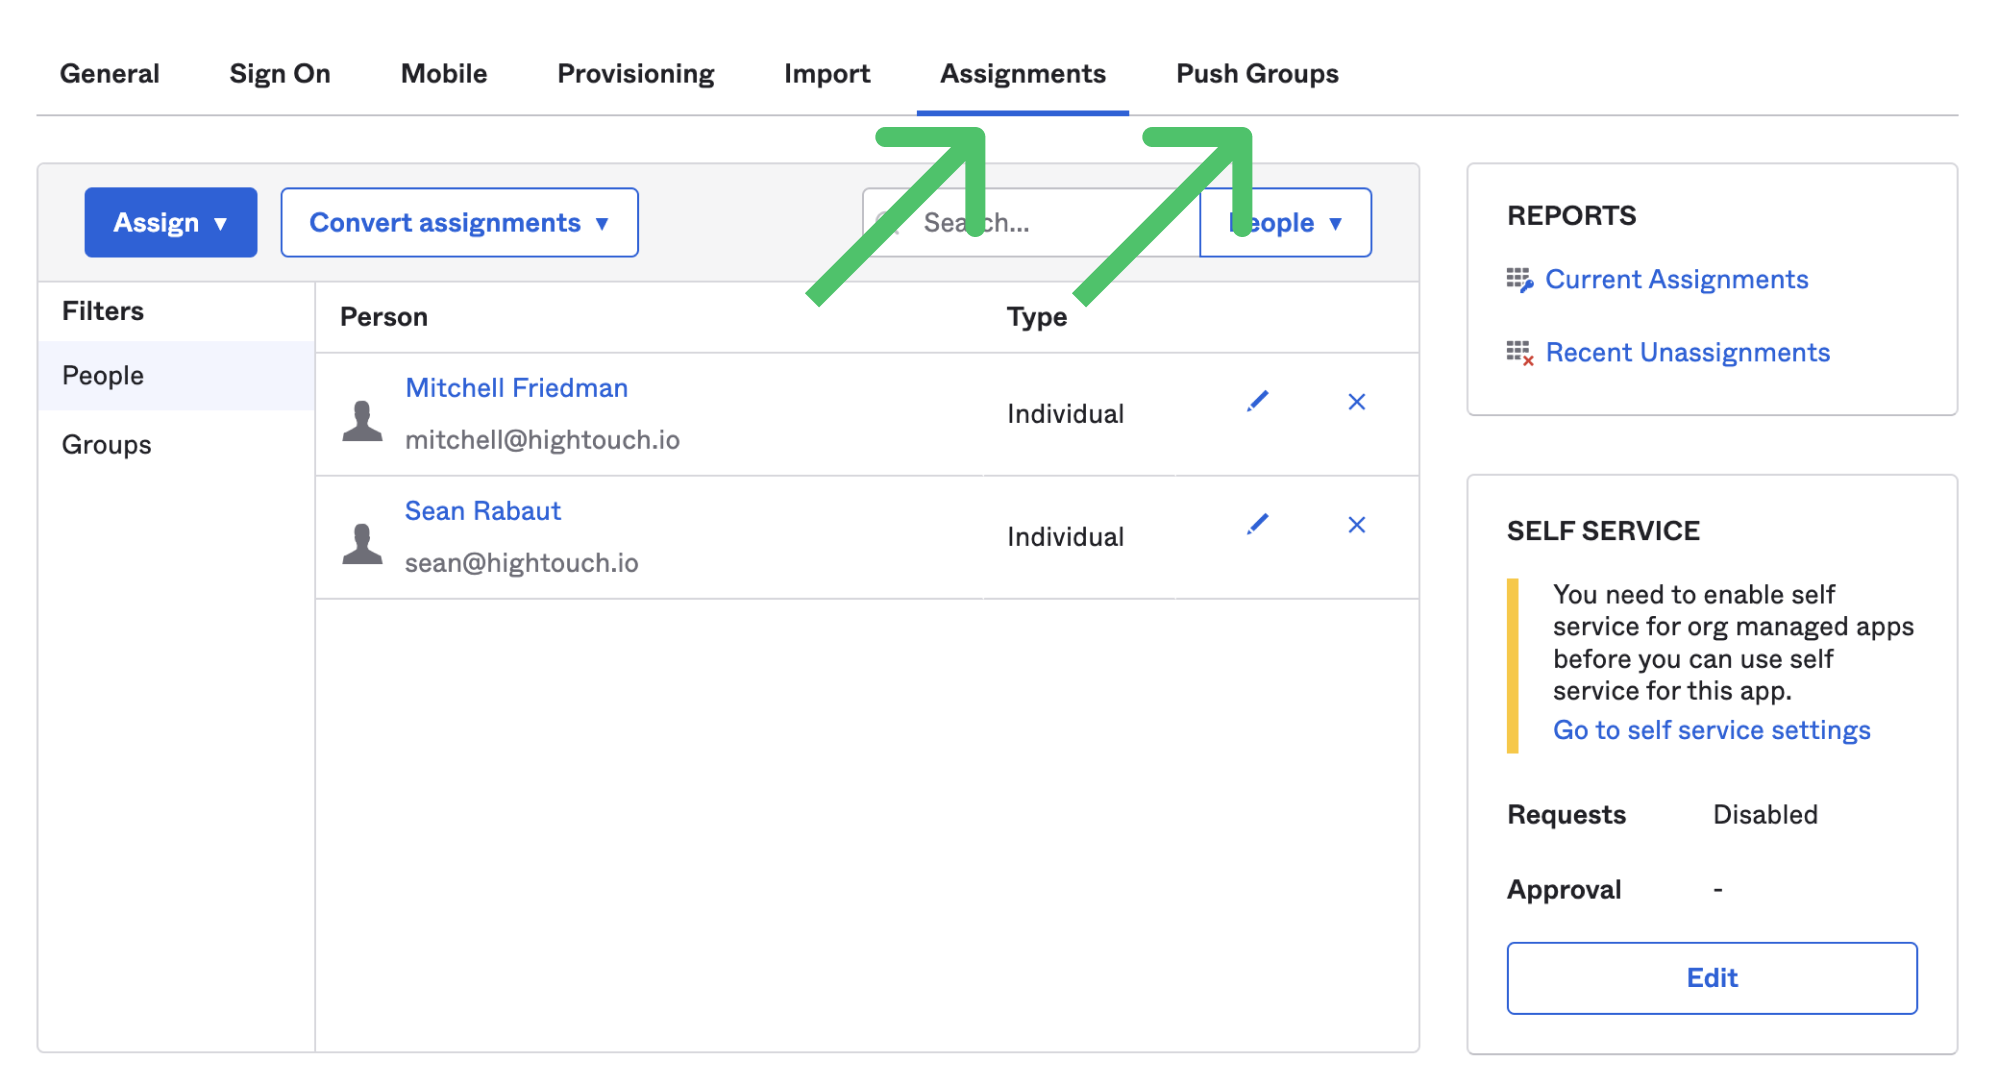
Once you've set up SCIM provisioning, make sure that you assign relevant users and groups. In Okta, you must do this both from the Assignments tab and the Push Groups tab of your application.
FAQ
Where can I find my organization identifier to log in with SSO?
After configuring SSO, you can find your Login URL on the SSO tab of your Hightouch workspace. This URL consists of:
- the direct link to the SSO login page
- your Organization identifier, which is based on the on the Billing organization name on the Workspace settings tab
I've enabled SSO in my workspace—how do I invite the rest of my team?
When you enable SSO, users with an account with your SAML identity provider don't need to be invited to Hightouch. Once they log in with their SAML account to Hightouch, Hightouch creates an account for them automatically.
To log in with their SAML account, users can either:
- access the SSO login page and insert the organization identifier
- access the direct SSO login page, which can be opened via the Login URL
Read the section above to learn more about these concepts.
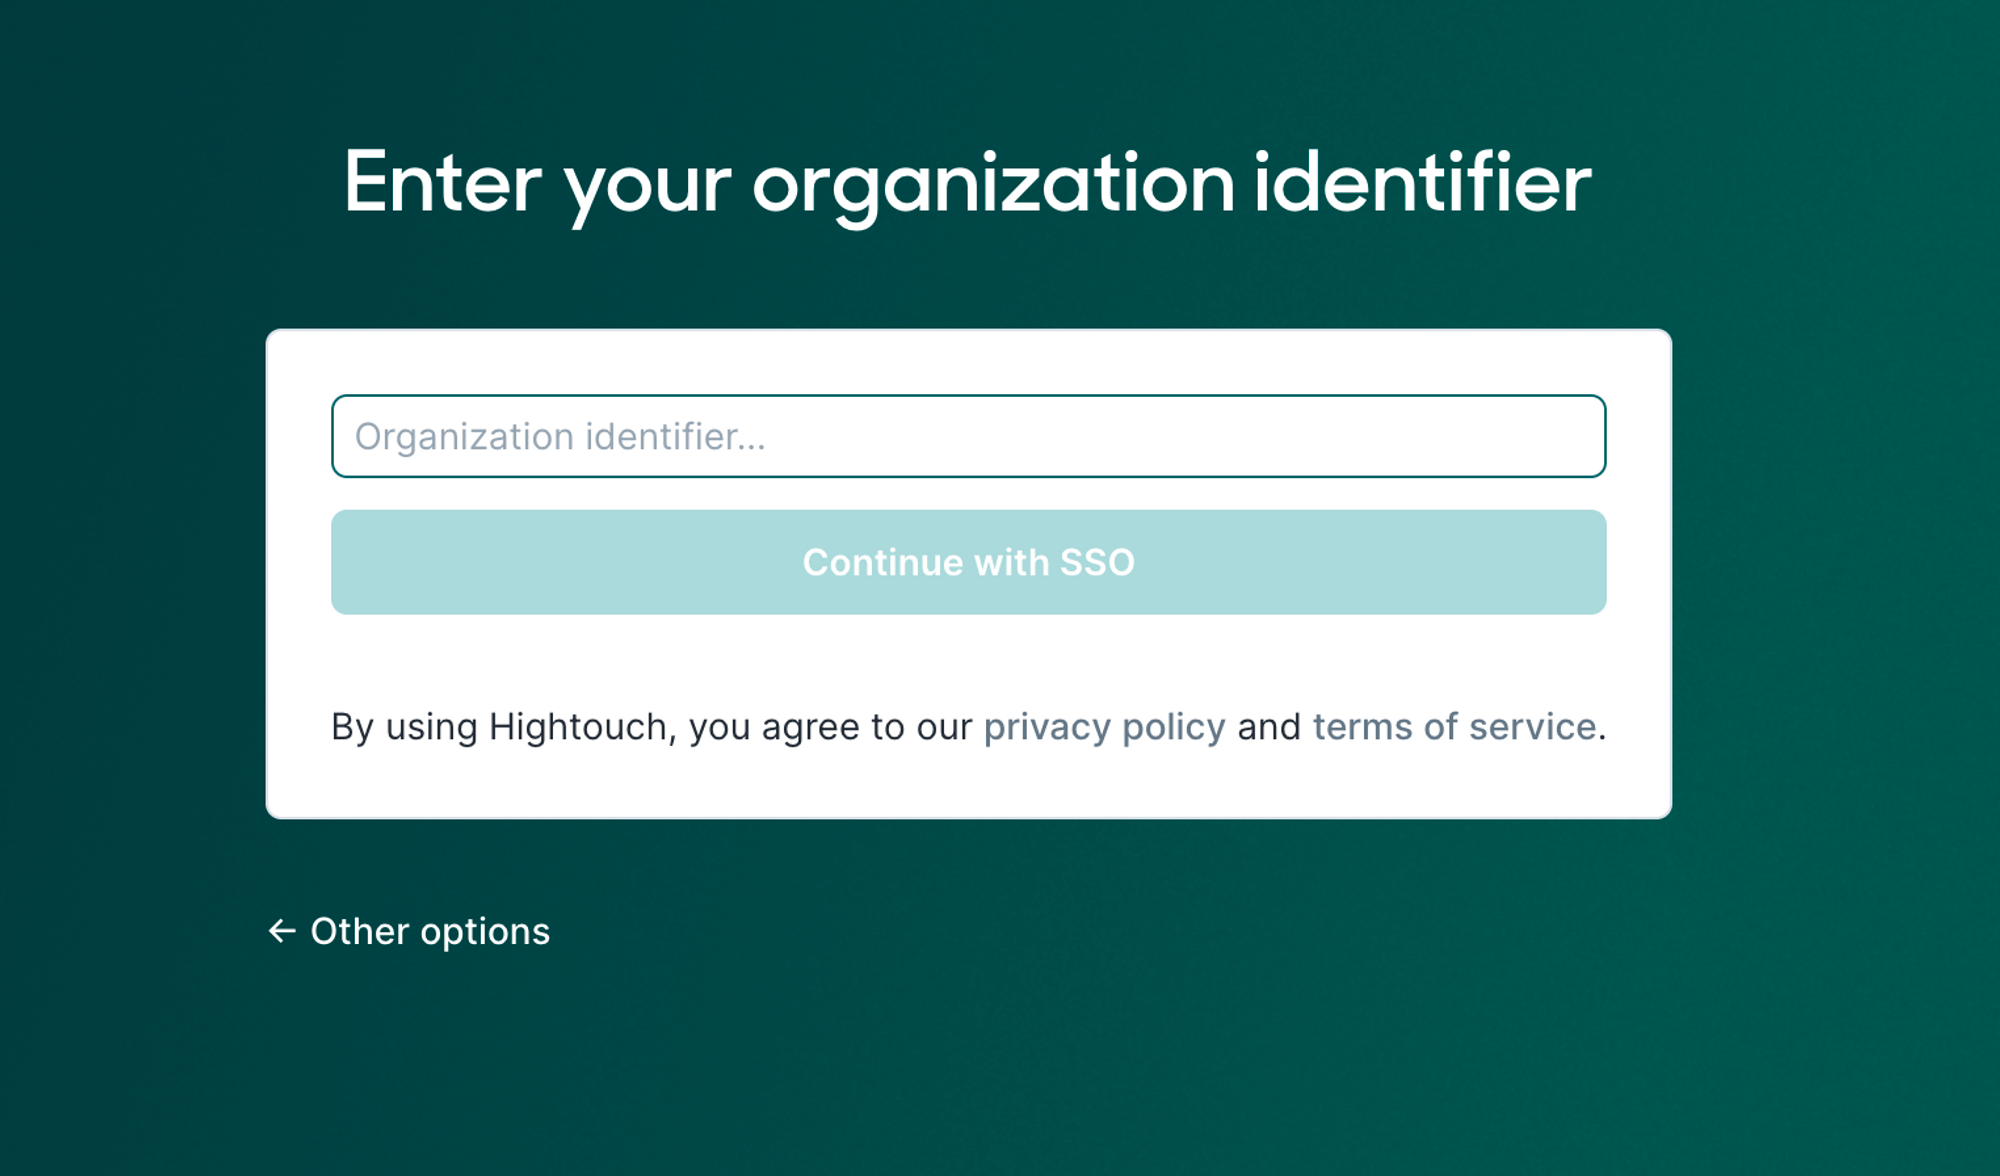
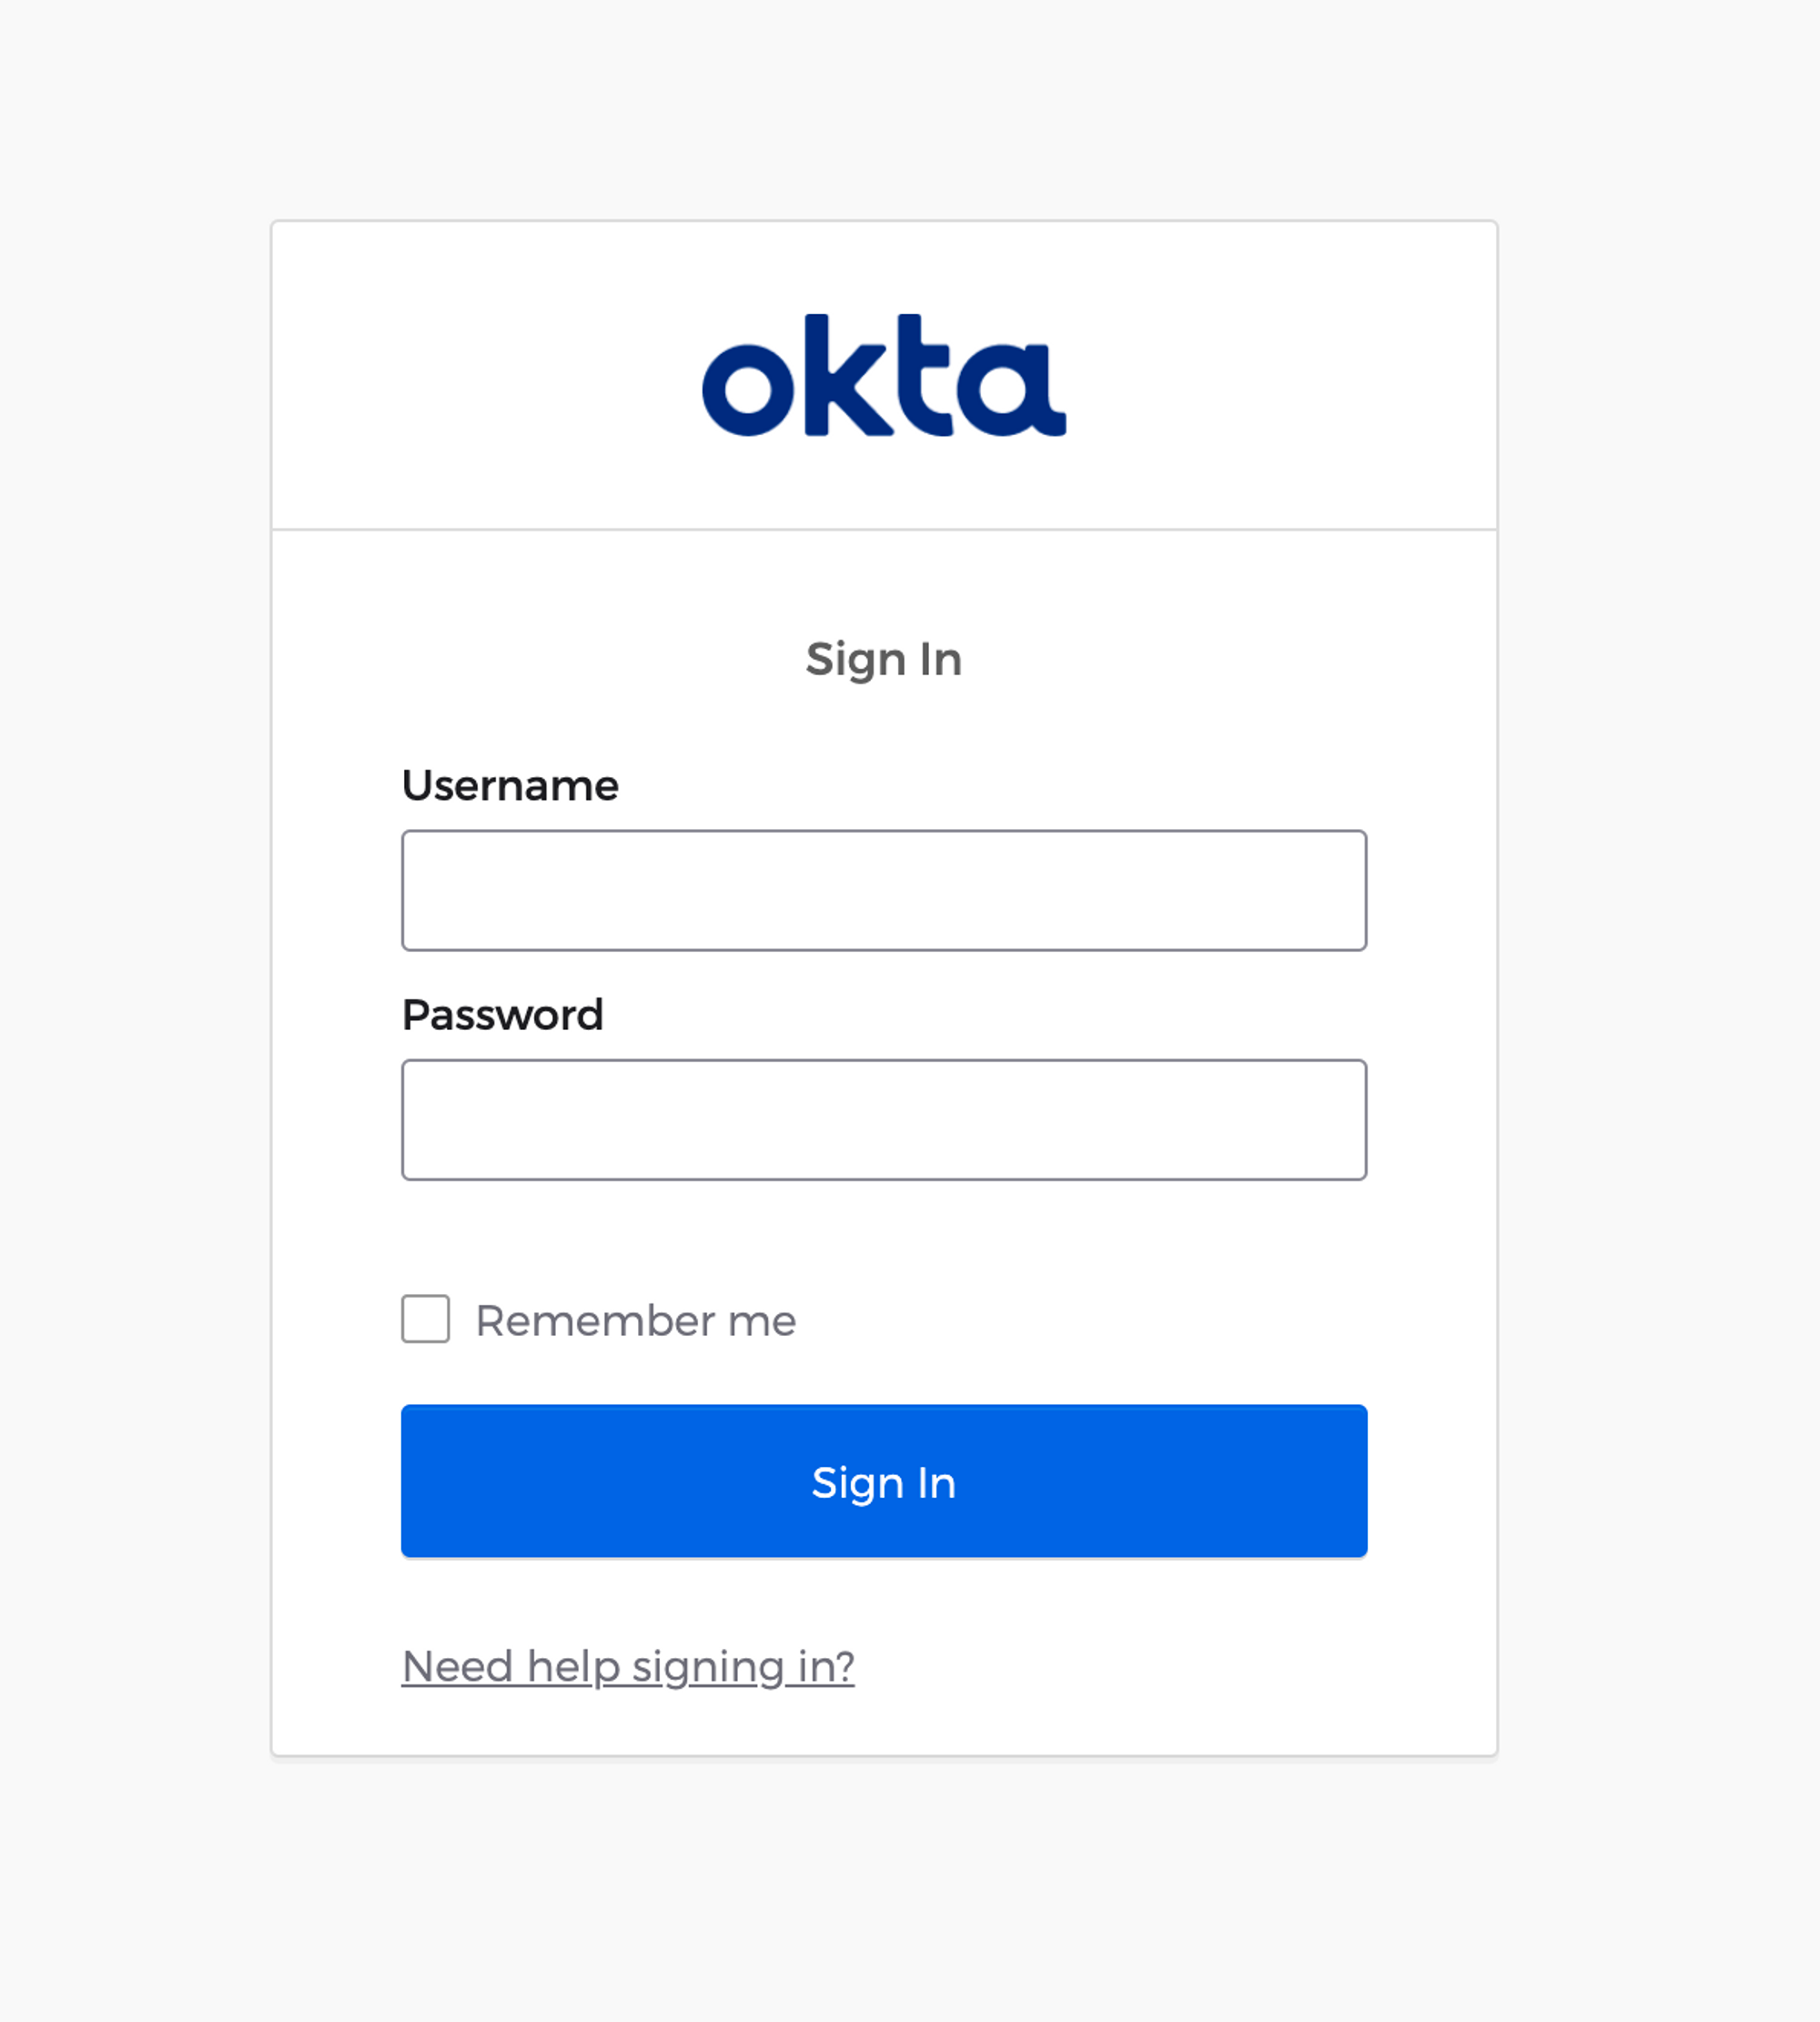
After clicking Continue with SSO, the user should insert their SSO credentials on the following page to proceed with logging in.
After successfully logging in, the user will now appear on your Hightouch workspace's Members tab as a new member.
If you want to invite a non-SAML user to your workspace, ensure you've enabled the toggle on your SSO tab to Allow inviting users.
When trying to login, I get redirected to app.hightouch.com/login.
If you see the Log in to Hightouch page instead of your Hightouch workspace after logging in with SSO, you need to make sure your IT team has appropriately set the Audience URI as the SAML Audience URL per the SAML SSO setup instructions.
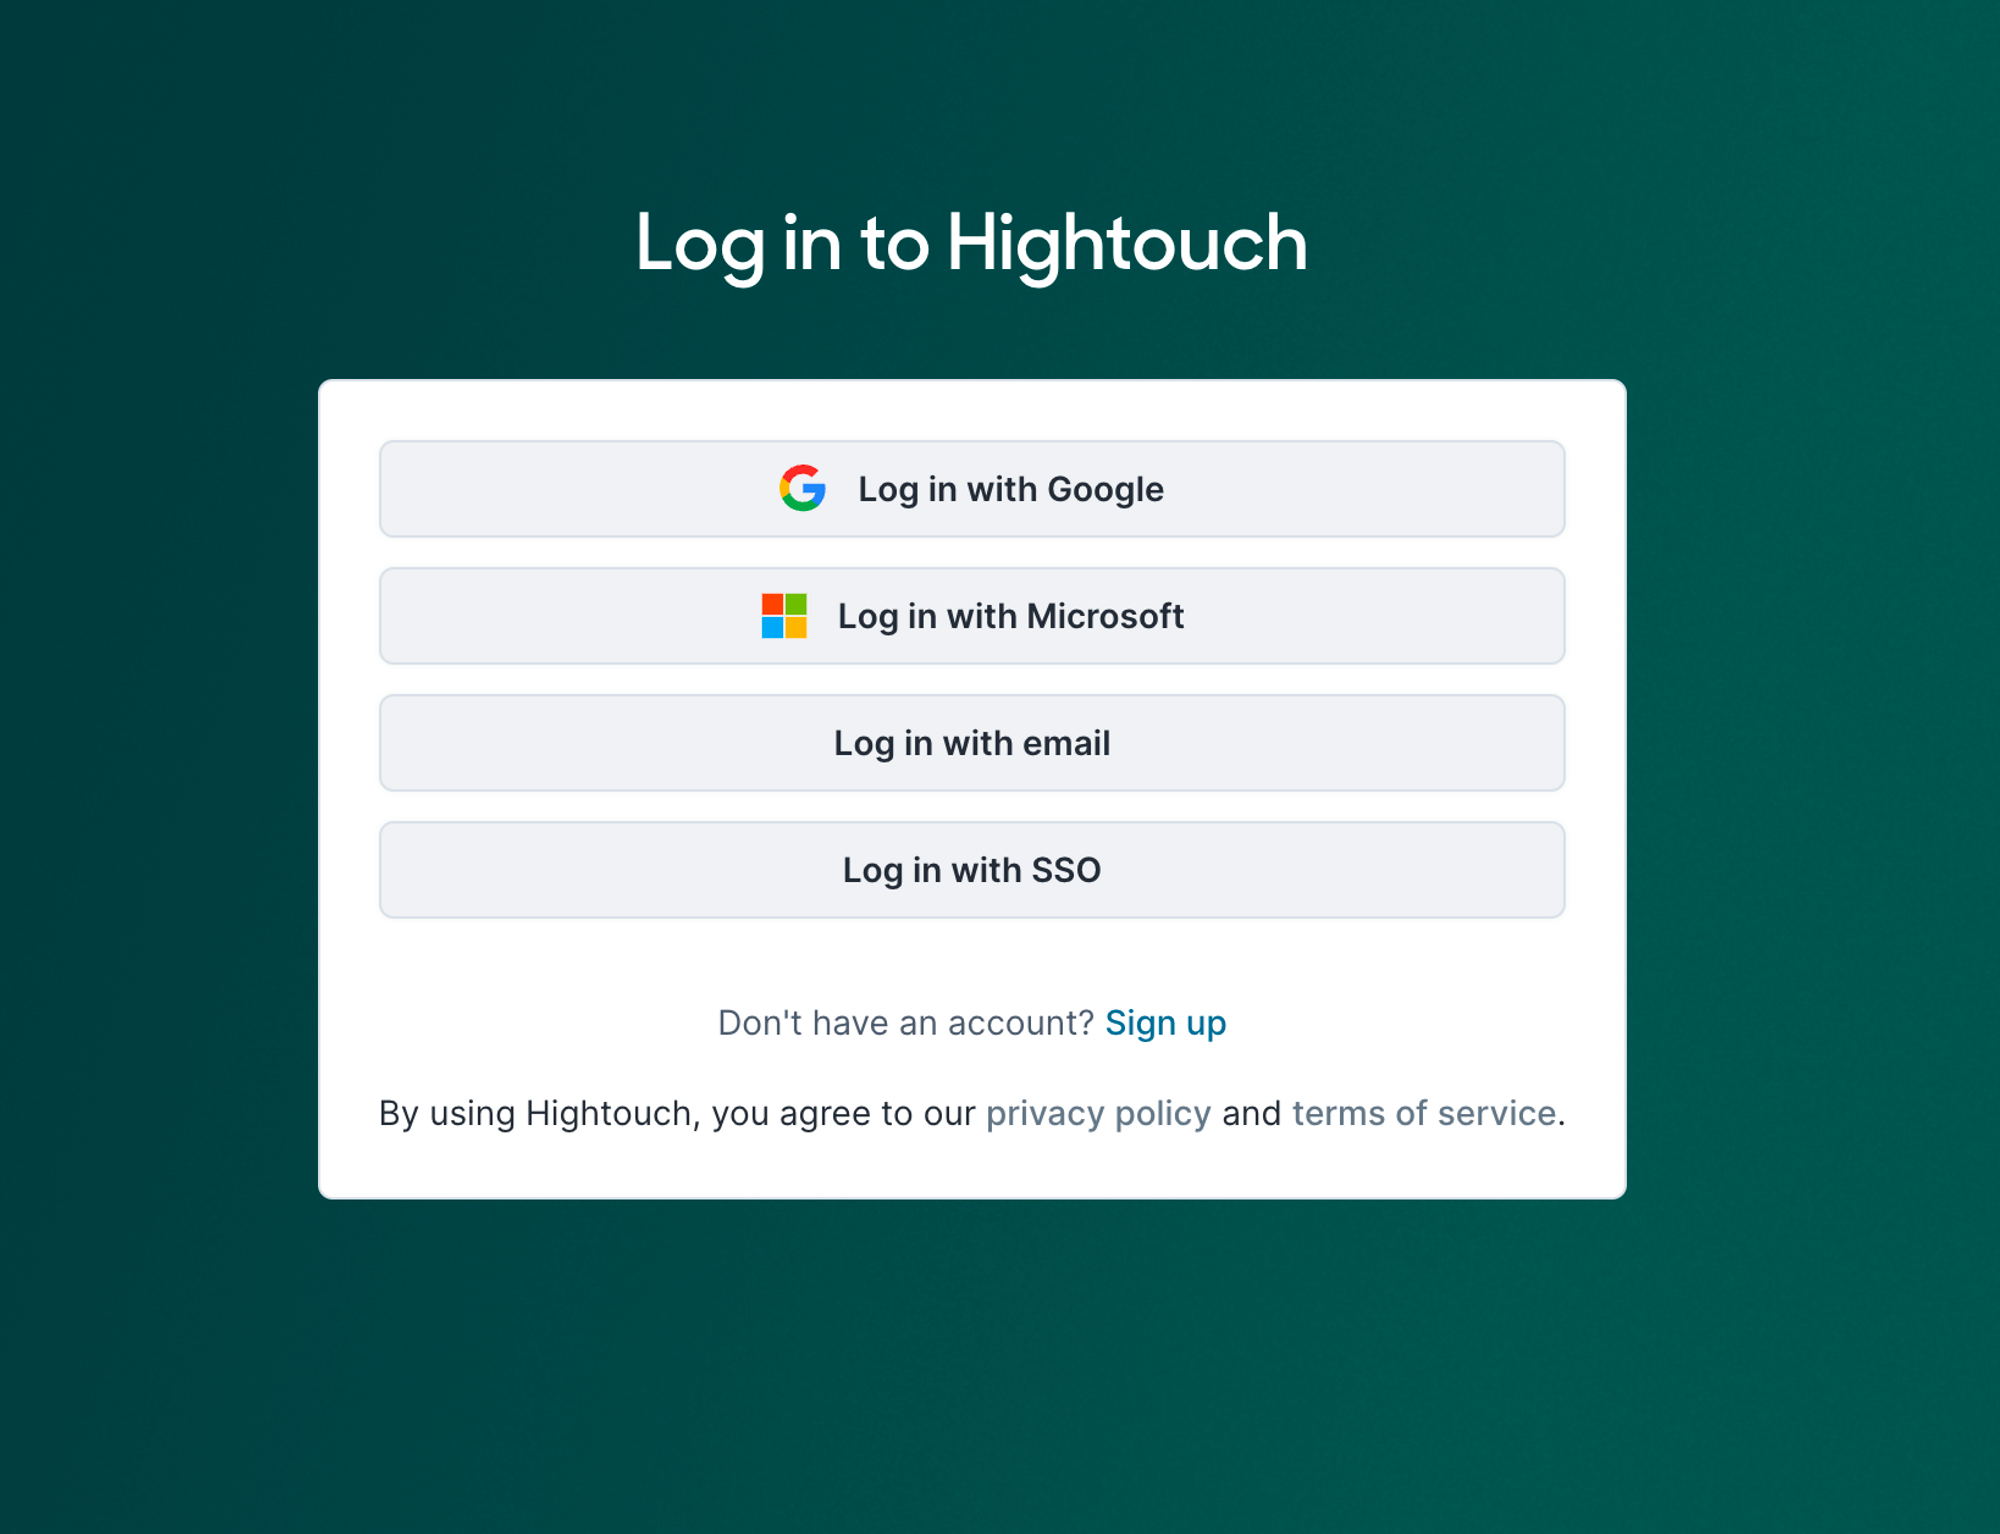
After accepting an invitation to join a Hightouch workspace, I don't see any workspaces when I log in to Hightouch.
As explained in this section above, if your workspace has SSO enabled, you won't need to accept any invitation from your team to join their workspace. If you see the Welcome to Hightouch page instead of your Hightouch workspace after logging in with SSO, you need to make sure that you're following the correct login process to access your workspace.
First, sign in to Hightouch via SAML (instead of logging in with Google or Microsoft) through this link or the tile in your identity provider.
Second, ask your team to ensure that the workspaces you expect to join have a default role configured on the Workspace settings tab and that the toggle Use default role for SSO users is enabled.
When I log in to Hightouch after configuring SSO, I am shown an error on the log in page.
In your SAML configuration:
- Check that you have mapped attributes for
nameandemail. See the SSO setup instructions for more detailed steps. - Ensure you used the correct Hightouch SAML URL and audience URL provided in your dashboard.
If you made changes to the SAML app in your identity provider between uploading your self-serve SAML settings, you can try to re-generate a certification and upload the new app settings on the Hightouch SSO tab.
After logging in for the first time with SSO, I see a duplicate user in Hightouch with my new email.
This is expected. Your SSO user account is a different Hightouch user account than the original account that wasn't linked to your identity provider. You can manually delete the original user if you no longer want a social authentication method to have access to your Hightouch workspace.
I don't see any groups on the SSO tab of my dashboard.
You only see groups and their mapped roles on your SSO tab if you have configured your identity provider with the groups attribute name. You also need to log out and log back in again for Hightouch to receive your most up-to-date user groups.
My group was updated in my organization's identity provider, but I still have the same role in Hightouch.
Log out and back in to Hightouch to be assigned your updated role.
Why can't I update the role of my team members on the Members tab?
Changing individual user roles isn't allowed for workspaces using SSO since we don't want to enable users to circumvent permissions set in their organization's identity provider.
There are two ways to update SSO member roles:
- If you are using SAML group mappings, change the user's SSO group mapping to the desired Hightouch role.
- If you aren't using SSO group mappings, users inherit the default role of the workspace, so change the workspace default role.
SAML group mappings is the recommended way to manage SSO user roles.
After enabling SCIM, when I add users to my SAML Hightouch integration I see an error saying "Matching user not found"
When you enable SCIM, you need to enable your identity provider to create users in Hightouch. For example, in Okta, under the Provisioning tab, you need to enable your Hightouch integration app to Create Users, Update User Attributes, and Deactivate users.
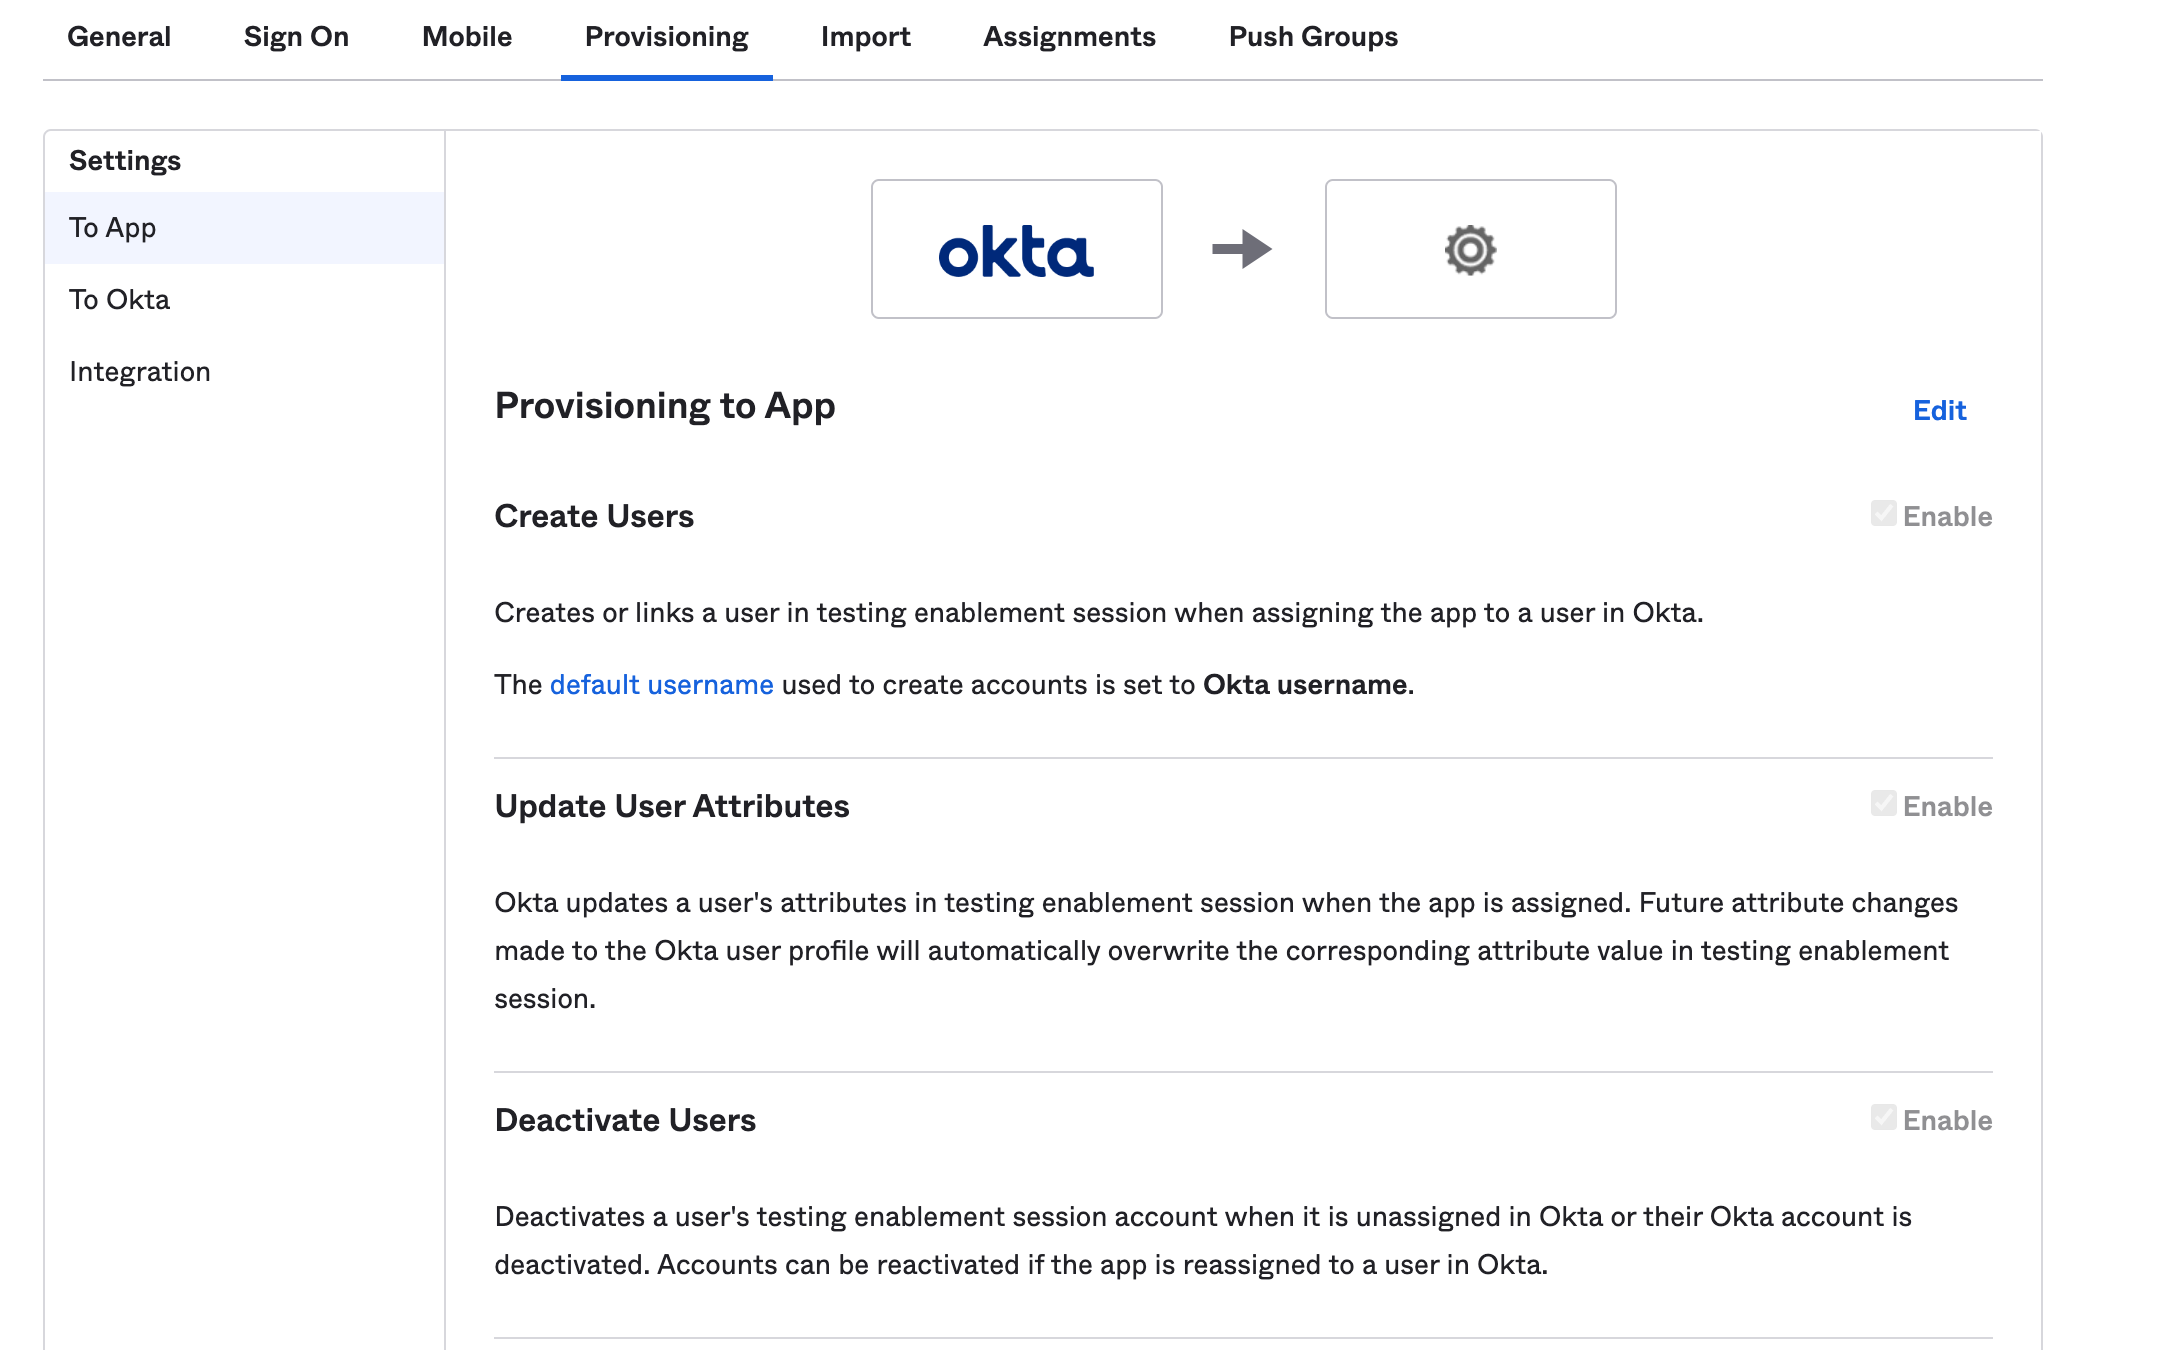
After you've made these changes, delete any users showing the "Matching user not found" error and re-add them.
I assigned a role to an SSO group I'm part of but I'm being assigned the workspace default role
If you're using Okta as your SSO provider and if a user belongs to multiple groups in Okta, your identity provider only sends Hightouch the SSO group with highest priority. If you notice that an SSO user still has the workspace default role assigned to them even after assigning a role to an SSO group they're part of, the user might be a member of an SSO group with higher priority. If this SSO group with higher priority isn't assigned any role, the user is assigned the workspace default role.
You must map a role to every SSO group you want to use in your workspace, otherwise users are assigned the default workspace role. SSO group roles are valid on a workspace level and not on an organization level, so assigning a role to an SSO group in one workspace won't have an effect on your other workspaces.
I am a member of multiple SSO groups but I'm not being assigned the role of the group with highest priority in Okta
If you're using Okta as your SSO provider and you notice that your SSO user in Hightouch isn't being assigned the role of the SSO group with highest priority in Okta, make sure to click the Push Now button to synchronize Okta and Hightouch. You can read more about this in Okta's documentation.
Some SSO identity providers don't support group prioritization, such as Microsoft Entra ID (formerly known as Azure Active Directory). Check with your identity provider to understand their capabilities.
I can't delete SSO members from my workspace
If you edit your SSO provider settings and remove an SSO user from all SSO groups that are present in your workspace, that user loses access to the workspace. However, they're not automatically deleted from the Settings/Members page in Hightouch. Please if you would like to remove former SSO users from that page.